Skip to content

The Grade Center allows you to create weighted grade columns. There are several different ways to calculate weighted totals in the Grade Center.

Weighted Grade Calculation Example

For example, you can calculate a weighted total:

  • by item
  • by category
  • by weighted running total
  • when dropping the lowest score from a category
  • in categories with equally weighted items consisting of different point values
  • in categories with proportionally weighted items consisting of different point values

Want more information?

Understanding Weighted Grades
Grade Center - Weighting Grades
Grade Center - Categories
Try these Blackboard How-To documents
Explore Blackboard’s On Demand Learning Center
Visit our Blackboard FAQs for additional blackboard information
or schedule a one-on-one session, email, or
call Janice Florent: (504) 520-7418.

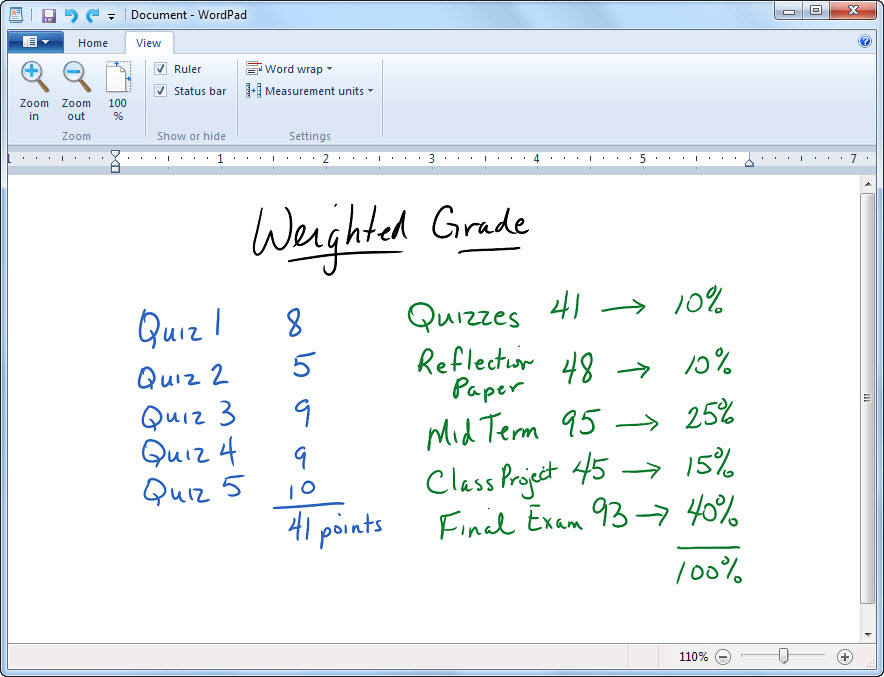
Categories can integrate with Grade Center calculated columns such as Weighted Grade Column, Total Points Column, or Average Grade Column. For example, you could weight your grades by categories assigning 20% of the final grade to the category "Assignments," 30% to the category "Tests," 20% to the "Project," and 10% each to the categories "Discussions," "Blogs," and "Journal" as shown in this example:

Grade Categories Pie Chart Example

The total of all the categories should equal 100%.

Categories are useful when you want to drop grades. Use categories to drop the lowest grade (or a number of grades) and then include the result in Grade Center calculations. Alternatively, you can use the highest grade in a category to include in Grade Center calculations. Regardless of how many items are in each category (as shown by the white circles in the pie chart example above), the category weight remains the same.

Additionally, you can create an Average grade column to calculate statistics for all columns that are in a particular category. Gradable items that are in that category would automatically be included in the average calculation.

Categories are helpful in organizing and utilizing the Grade Center. If you assign columns to categories you would be able to sort the Grade Center by a specific category to compare how the students scored in the category.

You can use categories with Smart Views in order to have only columns associated to specific category or categories shown in the Smart View.

Follow these steps to do it.

To create categories:

  1. Goto the [Control Panel] for the course and click on the [Grade Center] link to expand it. Click on [Full Grade Center].
  2. Roll your mouse over [Manage] on the menu bar and select [Categories] from the drop down menu.
  3. Click on the [Create Category] button.
  4. Enter a name for the Category then click [Submit].

To edit/delete categories:

  1. Goto the [Control Panel] for the course and click on the [Grade Center] link to expand it. Click on [Full Grade Center].
  2. Roll your mouse over [Manage] on the menu bar and select [Categories] from the drop down menu.
  3. Roll your mouse over the category you would like to like to edit/delete then click on the arrow to the right of the category name. Select the appropriate action from the shortcut menu.

NOTE: You can delete any category you created as long as the category is not in use. Default categories cannot be deleted. Categories currently in use will not have the Delete option.

Want more information?

Grade Center - Categories (PDF)
Grade Center - Weighting Grades
Grade Center - Smart Views
Try these Blackboard How-To documents
Explore Blackboard’s On Demand Learning Center
Visit our Blackboard FAQs for additional blackboard information
or schedule a one-on-one session, email, or
call Janice Florent: (504) 520-7418.

1

A weighted grade column is a calculated column that displays the calculated result of component parts (columns and/or categories); each part is worth some percentage of the total. You can create a weighted grade based on any column and/or category in the Grade Center. For example, you can create a weighted grade column that calculates the final grade for the course. Categories such as Test, Discussion, and Assignment would be given a certain percentage of the final grade along with the percentage for other grade columns (e.g. Mid-term, Final Exam).

Weighted Grade Pie Chart Example

Follow these steps to do it.

To add a weighted column to the Grade Center:

  1. Go to the [Control Panel] of the course you want to add a weighted column. Click on the [Grade Center] link to expand it.
  2. Click on [Full Grade Center].
  3. Move the mouse over the [Add Calculated Column] button and select [Weighted] from the drop down menu.
  4. Enter a name that describes what the weighted grade column is in the Name field. Grade Center display name and description are optional.
  5. Select how you would like the results of the weighted grade to be shown by clicking on the pull down arrow and selecting primary display from the list. Secondary display is optional and will only be shown in the Grade Center.
  6. In the select columns section, choose which grade columns and/or categories will be used in the calculation of the weighted grade by clicking on the grade column or category and then clicking on the respective arrow to move the column/category over to the selected columns area.
  7. Enter the weight percentage to be applied to each column/category you selected. The total weight must equal 100%.
  8. When selecting a category you can choose to weigh columns equally or proportionally and whether to drop grades in the category or to use the highest or lowest grade in the category.
  9. Choose whether to calculate the weighted grade as a running total which would include only the columns that have been graded in the calculation.
  10. In the options section you should indicate whether you want to include this weighted grade column in grade center calculations, show the weighted grade column in My Grades, and show statistics for the weighted grade column in My Grades. My Grades is what is shown to your students when they go into your course.
  11. Click [Submit] when you are finished entering all your information and selecting the options. The weighted grade column will be added as the last column in the Grade Center.

Want more information?

Grade Center - Weighting Grades (PDF)
Try these Blackboard How-To documents.
Explore Blackboard’s On Demand Learning Center.
Visit our Blackboard FAQs for additional blackboard information
or schedule a one-on-one session, email, or
call Janice Florent: (504) 520-7418.

carpenter's toolbox

Course Tools are communication and collaboration tools that enhance the interaction between instructors and students in Blackboard courses.

When viewing the Course Tools in the Control Panel you see a number of tools listed there. How do you know which tool is right for the job?

The Center for Faculty Excellence at Fresno State developed a handy two page guide designed to help you to pick the right Blackboard tool for the job. If you know what tool you want to use, you can follow the row across to see it's strengths and weaknesses. If you know what you want to achieve, you can pick a column and follow it to see which tool is best for the job.

Try out this handy Blackboard 9.1 Tool Guide and let me know what you think.

Note: The Elluminate tool referenced in the guide is now Blackboard Collaborate.

Want more information?

Blackboard 9.1 Tool Guide (PDF)
Try these Blackboard How-To documents.
Explore Blackboard’s On Demand Learning Center.
Visit our Blackboard FAQs for additional blackboard information
or schedule a one-on-one session, email, or
call Janice Florent: (504) 520-7418.

Photo credit: Carpenter's Toolbox | CC0

You can create rules to apply color to the cells in the Grade Center. Creating color rules in the Grade Center provides visual indicators to help you interpret information quickly. For example, you can use yellow to highlight graded items with failing scores so students and columns that require attention are prominent. Also, you can assign colors to the following grading statuses: In Progress, Needs Grading, or Exempt.

Grade Center Color Coding

By default, color coding is not enabled in the Grade Center, and to use color coding you need to enable it. After you define and save the color rules, the color coding applies to all Grade Center views.

Follow these steps to do it.

To add color coding to the Grade Center:

  1. Go to the [Control Panel] of the course you want to add color coding to. Click on the [Grade Center] link to expand it.
  2. Click on [Full Grade Center].
  3. On the action bar, point to [Manage] menu, and then select [Grading Color Codes].
  4. On the Grading Color Codes page, select the check box for Enable Grading Color Codes.
  5. In the Color Coding Options section: For each Grading Status, click the down pointing arrows icon in the Background Color column to access the Swatch Color box.
  6. In the Swatch Color box, select a color and click [Apply] to save it.
  7. In the Grade Ranges section: Click [Add Criteria] to create a color rule.
  8. In the Criteria drop-down, select Between, More Than, or Less Than.
  9. Type a percentage in the box or boxes.
  10. For Background Color and Text, click the down pointing arrows icon to access the Swatch Color box. Select a color and click [Apply] to save it.
  11. Click [Add Criteria] to create an additional Grade Ranges field.
  12. Click [Submit] when done.

Want more information?

Color Coding the Grade Center
Watch a video about Color Coding the Grade Center [1:46]
Try these Blackboard How-To documents.
Explore Blackboard’s On Demand Learning Center.
Visit our Blackboard FAQs for additional blackboard information
or schedule a one-on-one session, email, or
call Janice Florent: (504) 520-7418.

Turnitin document viewer

The new Turnitin Feedback Studio is currently available with our Blackboard integration. Turnitin Feedback Studio offers all the functionalities of Turnitin, but with a simplified, more intuitive interface. Turnitin Feedback Studio’s simplified, more intuitive user experience brings together the grading, feedback, and similarity checking services in one view. Additionally, the contextual marking approach of the iPad app allows educators to click anywhere on the paper and leave a comment, QuickMark Comment, or text comment at any time.

Turnitin Feedback Studio vertical toolbar

In the Feedback Studio interface, the GradeMark and Originality Report tools are integrated in one vertical toolbar. New features include the ability to view the Originality Report with different filters turned off and on.

Ultimately, Turnitin Feedback Studio will make it faster and easier than ever to promote academic integrity, provide actionable feedback, and evaluate student learning.

You will see the new interface when you open a student’s paper in Turnitin. Your students will also experience this new and improved interface when viewing Similarity Reports and receiving feedback.

Want more information?

Turnitin Feedback Studio Walkthrough video [2:56]
Feedback Studio Instructor User Manual
Feedback Studio Student User Manual
Try these Blackboard How-To documents.
Check out help for instructors at help.blackboard.com.
Explore Blackboard’s On Demand Learning Center.
Visit our Blackboard FAQs for additional blackboard information
or schedule a one-on-one session, email, or
call Janice Florent: (504) 520-7418.

wall of binary numbers with robot in forground

As an instructor, you want to be confident that your course is well designed and functions as intended—before your students see it.

With Student Preview, instructors can navigate their courses just as their students would. While in Student Preview mode, instructors can perform student activities such as:

  • Submit assignments
  • Take tests
  • Create blog and discussion posts
  • Create journal and wiki entries
  • View student tools, such as My Grades

You can use Student Preview to review the course content and validate the course behaviors, such as those that control the availability of course content or require a particular interaction from the student to be triggered.

The Student Preview feature provides a new button that appears in the breadcrumb bar next to the course Themes and Edit Mode buttons and is shaped like an eye.

Note: Now with the new Student Preview feature available, test students are no longer needed. The “Add Test Student” course tool was removed as well as all test student accounts.

Follow these steps to do it.

To Enter Student Preview Mode:

  1. Select the Enter Student Preview function. You will see a student preview bar at the top of every page letting you know you are in student preview mode.

student preview button

To Exit Student Preview Mode:

  1. Press the Exit button on the student preview bar that appears at the top of the page.

exit student preview button

Want more information?

Watch a video about Student Preview [2:23].
Using Student Preview.
Try these Blackboard How-To documents.
Explore Blackboard’s On Demand Learning Center.
Visit our Blackboard FAQs for additional blackboard information
or schedule a one-on-one session, email, or
call Janice Florent: (504) 520-7418.

Photo credit | CC BY-NC 2.0

town crier making announcement

Announcements provide timely information for your students about class activities. Announcements are the ideal way to post time-sensitive material. The announcement area can be used to remind students of assignment and/or test dates, post changes to the course, announce upcoming events (such as a guest speaker), etc. You may direct students to a particular section of your course from an announcement. You also have the option to broadcast announcements to your students' email. That means the announcement appears on Blackboard, and also is sent to students' email.

You may post multiple announcements when setting up your course and time them to be released separately by choosing staggered future display dates. For example, you know now that you want to post an announcement about the midterm exam and another about the final. Write both announcements now, but set the midterm announcement to display the week before the midterm and the final exam announcement to display a week before the final. Students will not be able to view either announcement until their assigned display dates.

Follow these steps to do it.

  1. On the Control Panel, go to [Course Tools] and select [Announcements].
  2. Select [Create Announcement].
  3. Type a subject and message for your announcement.
  4. Choose to restrict the announcement by date or not.
  5. Select the Email Announcement check box to send students an email containing the announcement.
  6. Select [Submit].

Want more information?

Creating Announcements [video]
Try these Blackboard How-To documents.
Explore Blackboard’s On Demand Learning Center.
Visit our Blackboard FAQs for additional blackboard information
or schedule a one-on-one session, email, or
call Janice Florent: (504) 520-7418.

image showing various disasters

Course delivery is vulnerable to unplanned events. Potential interruptions to class activities include but are not limited to natural disasters, widespread illness, acts of violence, planned or unexpected construction-related closures, severe weather conditions, and medical emergencies.

Here are a few things you can do in Blackboard to help you prepare should the need arise.

Additionally, you should consider developing an instructional continuity plan to help you to be ready to continue teaching with minimal interruption. More information about instructional continuity plans can be found on our Instructional Continuity web page. There you will find planning guides, resources, and a link to our September 2015 Instructional Continuity workshop presentation.

Want more information?

Get more information about instructional continuity plans.
Sign up for Blackboard workshops or request one-on-one help.
Try these Blackboard How-To documents.
Explore Blackboard’s On Demand Learning Center.
Visit our Blackboard FAQs for additional blackboard information
or schedule a one-on-one session, email, or
call Janice Florent: (504) 520-7418.

Image credit: "The threat of disasters is real" by jflorent is licensed under CC BY-NC-SA 4.0

checklist

As you prepare for the start of the semester, it is a good time to get started setting up your Blackboard courses. Blackboard courses are automatically created using the course information in Banner a few weeks before the start of the semester. You can post your syllabus, course documents, and announcements to your Blackboard courses. You can also customize your course menu and/or add a course banner.

If you teach a course that is cross listed you will have a Blackboard course for each cross listing. You can combine the cross listed courses into one Blackboard course so that you can post course materials and grades to one combined Blackboard course. Combining courses may also work for you if you are teaching different sections of the same course and would like to have the different sections combined into one Blackboard course so that you can post course documents and grades in the one combined course. The beginning of the semester is the best time to combine your Blackboard courses before you add course material or grades to the courses.

NOTE: Currently, the section merge tool is NOT working. A system administrator will have to merge your courses. Send an email to Yamlak Tsega (ytsega@xula.edu) if you want to merge courses. You should include the course ID (including CRN) for all the courses you want merged together. Also indicate which of the courses to be merged together that you want to be the parent/primary course.

Follow these steps to do it.

Listed below are links with instructions for

Want more information?

Attend a drop-in session to get one-on-one help.
Explore Blackboard’s On Demand Learning Center.
Try these Blackboard How-To documents.
Visit the Blackboard FAQs for additional blackboard information
or schedule a one-on-one session, email, or
call Janice Florent: (504) 520-7418.