Skip to content

white noise

Research shows students want specific and detailed feedback from their instructors (Balaji & Chakrabarti, 2010). Sometimes text-based feedback can become white noise to students who often admit they don't read it. This is not to say that text-based feedback is not valued, however voice is particularly impactful in our text-based world. Audio feedback is an option that saves time, cuts through the noise, and is preferred by students (Ice, Swan, Kupczynski, & Richardson, 2008).

The ability for an instructor to leave a personal voice comment is a powerful tool for providing feedback to students. Turnitin's GradeMark (online grading) has a feature that lets instructors add a voice comment to a student’s paper. With voice comments students can hear the reasons for a grade or the tone of voice or inflection behind the written feedback.

Turnitin voice comments bar

With just a few clicks, instructors can quickly record a detailed message of up to 3 minutes in length and attach it to the student’s paper. Instructors can use the orally recorded feedback as a supplement to written comments.

Want more information?

Instructions for adding voice comments (video) are available.
How to use Turnitin GradeMark (PDF) (GradeMark Interactive Tutorial)
Explore Blackboard’s On Demand Learning Center.
Check out help for instructors at help.blackboard.com.
Try these Blackboard How-To documents.
Visit the Blackboard FAQs for additional blackboard information
or schedule a one-on-one session, email, or
call Janice Florent: (504) 520-7418.

Humanized learning increases the relevance of course content and improves students' motivation to log-in to your course week-after-week. Whether you are teaching a face-to-face, hybrid, or online course, humanizing and personalizing your Blackboard course can go a long way to providing an inviting space for your students.

One of the ways you can humanize your Blackboard courses is to add a profile avatar. By default, when you do not setup your profile avatar it will appear as a blank avatar in the Blackboard system. Rather than having this gray faceless image, faculty and students can upload a profile image (avatar) to represent them throughout the Blackboard system.

profile avatar

The profile avatar appears in the page header, people tool, blogs, journals, discussions, wikis, and roster. The profile avatar also appears in the notifications modules—What's New, Needs Attention, and To Do—which appear on the Xavier University tab or on a course's home page.

The recommended pixel size for an avatar is 150 by 150. Larger images should be clipped.

You can only have one avatar picture at a time to be used throughout the entire Blackboard system.

NOTE: The University has the following policy regarding profile avatars:

Users may not send, display or receive pictures or other media which are copyrighted, abusive, obscene, sexually inappropriate, threatening, racially offensive, or considered harassment or offensive to human dignity.

Faculty should include this statement about what is not an acceptable profile avatar when they ask students to upload a picture to be used as their avatar.

Follow these steps to do it.

To upload a picture to be used as your profile avatar:

  1. Expand the [Global Navigation Panel] by clicking the arrow on the right of your name.
  2. Click on [Settings].
  3. Click on [Personal Information].
  4. Click on [Personalize My Settings].
  5. Select [Use custom avatar image]. Click [Browse My Computer].
  6. Select the avatar image file and click Open.
  7. Click [Submit].

Want more information?

Step-by-step instructions to upload profile avatar (PDF) are available.
Humanizing your courses.
Personalize your Blackboard course using template variables.
Explore Blackboard’s On Demand Learning Center.
Try these Blackboard How-To documents.
Visit the Blackboard FAQs for additional blackboard information
or schedule a one-on-one session, email, or
call Janice Florent: (504) 520-7418.

checklist

As you prepare for the start of the semester, it is a good time to get started setting up your Blackboard courses. Blackboard courses are automatically created using the course information in Banner a few weeks before the start of the semester. You can post your syllabus, course documents, and announcements to your Blackboard courses. You can also customize your course menu and/or add a course banner.

If you teach a course that is cross listed you will have a Blackboard course for each cross listing. You can combine the cross listed courses into one Blackboard course so that you can post course materials and grades to one combined Blackboard course. Combining courses may also work for you if you are teaching different sections of the same course and would like to have the different sections combined into one Blackboard course so that you can post course documents and grades in the one combined course. The beginning of the semester is the best time to combine your Blackboard courses before you add course material or grades to the courses.

Follow these steps to do it.

Listed below are links with instructions for

Want more information?

Attend a drop-in session to get one-on-one help.
Explore Blackboard’s On Demand Learning Center.
Try these Blackboard How-To documents.
Visit the Blackboard FAQs for additional blackboard information
or schedule a one-on-one session, email, or
call Janice Florent: (504) 520-7418.

image showing classroom with empty chairs

As we approach the end of the semester there are a few things you can do in Blackboard to wrap up for the semester.

Download your gradebook

Student access to courses is removed two weeks after the end of a semester. During this process all grade book records are deleted. You should download your gradebook to your local computer after you submit your final grades.

Create a master copy of your course

Courses remain on the Blackboard system for three semesters before they are removed. You can request a Master Course Shell that you can use to develop and maintain your course materials. Master Course Shells will not be removed from the Blackboard system.

Hide old courses from view

When you login to Blackboard you will see your courses for previous semesters listed along with the courses you are currently teaching on the Xavier University and Courses tabs. If you do not want to see older courses in the list, you can hide them from view.

Follow these steps to do it.

Instructions are available in previous Bb tips for downloading your grade book, requesting master course shells, and hiding old courses from view.

Want more information?

Explore Blackboard’s On Demand Learning Center.
Check out help for instructors at help.blackboard.com.
Try these Blackboard How-To documents.
Visit the Blackboard FAQs for additional blackboard information
or schedule a one-on-one session, email, or
call Janice Florent: (504) 520-7418.

keep calm and create a master copy poster

Courses remain on the Blackboard system for three semesters before they are removed. You can request a Blackboard Master Course Shell that you can use to develop and maintain your course materials. Master Course Shells will not be removed from the Blackboard system. If you would like your course content/materials to be available in Blackboard beyond the current retention period of three semesters, you should request a Master Course Shell for the course.

Follow these steps to do it.

If you want your course/materials to be available in Blackboard, you should:

  1. Fill out the Master Course Shell Request form.
  2. Use Course Copy to copy the course content you want to keep into the Master Course Shell. Alternatively, you can start from scratch building content in your Master Course Shell.
  3. Copy the Master Course Shell contents into your “empty” Blackboard course once the course becomes available.

Note: You can share your Master Course Shell with other faculty members by filling out the Request to Grant User Access form.

Want more information?

Step-by-step instructions are available [Master Copies of Courses (PDF)].
Explore Blackboard’s On Demand Learning Center.
Try these Blackboard How-To documents.
Visit the Blackboard FAQs for additional blackboard information
or schedule a one-on-one session, email, or
call Janice Florent: (504) 520-7418.

1

by Janice Florent

The sixth tip in my series of accessibility related blog posts will focus on tables. A table is a means of arranging information into rows and columns. Tables are very useful for displaying data in an organized manner. Your course schedule and office hours are examples where formatting this information in a table could make the it more accessible.

Tables should be avoided when you want to simply format other content (i.e., just to line things up neatly.) Using tables just for layout purposes is not the best practice for accessibility and may make it nearly impossible for people who use assistive technologies to access the information. If you do choose to use a table to layout text on the page, make sure you lay it out so it will make sense when read from left to right. Text-to-speech software by default will read the information in a table left to right, cell by cell, and row by row.

Follow these tips when creating tables to make them accessible:

  • Do not use tabs or spaces to create tables. It may look like a table; however it will not be recognized as a table and can be confusing when read by assistive technologies.
  • Add Row and Column Headers to tables to distinguish the heading text from the data area of the table. Screen readers read simple tables efficiently when the column or row headers are clearly defined.
  • Repeat Row Headers if the table spans more than one page. Tables that are contained on multiple pages should have the header row repeated on each page.
  • When you use tables for the presentation of data, summarize the table to aid reader comprehension. This helps all students to know the high points of a table.
  • Break up complex tables (nested tables and merged or split cells inside of tables) into a series of simple tables. Simple tables are more usable for everyone.
  • The information in each cell should make sense if read without the column heading. For example, instead of entering 1, 2, 3, in a "Chapter" column you should enter Chapter 1, Chapter 2, Chapter 3, in the cells to make it clearer when read by a screen reader.

Here’s an example of two accessible tables:

example of accessible tables

This video shows how a screen reader reads information in tables. There is an example of a good and a bad table layout. The video demonstrates how reading order AND the information in the columns are important considerations when creating accessible tables.

In the bad example in the video, the use of the dash and abbreviations for the months can be confusing when read by a screen reader. The abbreviated months would have been less confusing if the year had been included. The use of 1,2,3 in the "Week" column in the bad example can be confusing as well. A better option is to use Week 1, Week 2, Week 3 in the respective column.

When applying structure to documents and web content, you should use the appropriate built-in formatting structure tools to do so. Doing so will make content accessible to everyone, including users of assistive technology.

Creating tables in MS Word:

  1. On the Insert tab choose Insert Table and select the appropriate number of rows and columns for your table.
  2. Select the header row in the table and press the right mouse button. A Table Properties window will open.
  3. Select the Row tab and check the box next to Repeat as header row at the top of each page. Press Enter key or Ok button. This header row will be repeated at top of each page.

Creating tables in PowerPoint:

  1. Use the Insert Table function in the Slide layout select the appropriate number of rows and columns for your table.

Working with tables in the Content Editor:

  1. In the Content Editor, click the insert/edit table function (example of accessible tables) and select the appropriate number of rows and columns for your table to begin adding a table in the text area.

You will remove significant barriers for users of assistive technology if you take these suggestions into consideration when creating course content. An added bonus is that if you include properly structured tables when creating your course content you will be ahead of the game in the event you do have a student who requires the use of assistive technology. Remember a properly structured table is good design and can benefit everyone.

Additional information about tables can be found at:
WebAIM: Creating Accessible Tables
Create accessible tables in MS Word 2010 (PDF) (Video [05:31])
Working with tables in the Content Editor

1

The Grade Center is more than just a way to record students' grades. It's a dynamic and interactive tool, allowing instructors to record data, calculate grades, and monitor student progress. In addition to being able to record grades, instructors can track student work and share private comments and feedback with students throughout the semester.

image showing Grade Center

The Grade Center is integrated with gradable items such as tests, assignments, discussion boards, blogs, journals, wikis, and ungraded items, such as surveys and self-assessments. Instructors can create Grade Center columns for activities and/or requirements done outside of Blackboard, such as exams given on paper, oral presentations, and participation.

Students also benefit when their instructor uses the Grade Center. Students have the opportunity to adjust their approach to learning to improve their performance when they see their grades and instructor feedback.

Follow these steps to do it.

Listed below are links to previous Bb tips on using the Grade Center:

Want more information?

Working with the Grade Center
Explore Blackboard’s On Demand Learning Center.
Check out help for instructors at help.blackboard.com.
Try these Blackboard How-To documents.
Visit the Blackboard FAQs for additional blackboard information
or schedule a one-on-one session, email, or
call Janice Florent: (504) 520-7418.

1

by Janice Florent

This blog post will continue my series of accessibility related tips that are intended to provide you with things you can do now to make your course accessible even before you have a student with a disability.

My fifth tip in this series focuses on lists. A list is a set of items that share a purpose and/or have common characteristics. Lists are great from an accessibility standpoint because they provide structured order to content in a linear fashion.

bulleted list

Properly structured lists help to identify order and hierarchy in documents and web content. Lists that are properly formatted allow all users, especially those using assistive technology, to identify and navigate through a related group of items. List items that are not properly formed or grouped may not be translated properly by assistive technology.

Unordered (bulleted) lists should be used when there is no order of sequence or importance. Ordered (numbered) lists suggest a progression or sequence.

Compound lists contain multiple levels of classification. For example, a compound home improvement list would have items organized by category (e.g. electrical, hardware, flooring, plumbing.) With compound lists, relationships are shown visually using indents and different item markers (i.e., bullets, numbers, letters, etc.).

Compound lists may be difficult for visual users to decipher if the visual cues are insufficient. Also, compound lists may be disorienting for nonvisual users. Use a simple list structure whenever possible.

As with headings, lists should be used correctly and for the right purposes. Lists should never be used for merely indenting or other layout purposes.

When lists are formatted using asterisks, hyphens or images to create the look of bullets in a document, users of assistive technology are not able to detect the hierarchical structure and relationship of the list items. You should never rely on indentation to provide a visual list, use the proper structure instead.

Lists should be created using the built-in tools for ordered (numbered) and unordered (bulleted) lists. Without using these tools, a list is not really a list, which makes the content more difficult for assistive technology users to fully understand.

Creating lists in MS Word and PowerPoint:

  1. Select the text that you want to add bullets or numbering to.
  2. On the Home tab, under Paragraph, select the appropriate bullet from the list.
create list in MS Word

Creating lists in the Content Editor:

  1. In the Content Editor, select the text that you want to add bullets or numbering to.
  2. Select the appropriate bullet from the list.
create list in Content Editor

You will remove significant barriers for users of assistive technology if you take these suggestions into consideration when creating course content. An added bonus is that if you include properly structured lists when creating your course content you will be ahead of the game in the event you do have a student who requires the use of assistive technology.

Additional information about lists can be found at:
Creating bulleted and numbered lists in MS Word and PowerPoint
Working with lists in the Content Editor

Photo Credit: bulleted list by ijustwanttobeperceivedthewayiam / CC BY SA 2.0

3

by Janice Florent

blind female student listening to screen reader describe information on her computer screen

The fourth tip in my series of accessibility related blog posts will focus on alternative text (alt text). Computers can read text on a screen but images, graphs, and charts are meaningless to visually impaired users. Alt text is an alternate method for supplying information about images to users who are visually impaired.

Alt text is important for screen reader users because a screen reader cannot describe an image. Since screen reader software cannot interpret images, it relies on alt text to communicate image information to the user. When an image does not have alt text the only information the screen reader can relay is that there is an image on the page and provide the file name for the image.

Alt text should describe an image so it makes sense in context. If a picture is worth a thousand words, then a short alt text description may be a poor substitute. While a concise alt text description is important, the alt text should be less than 125 characters. You want to think about what is the most important information you are trying to get across with the image and stay within the 124 or less characters. If the image requires a lengthy description, you should describe the image in the content of the page.

There are several ways to handle complex images (e.g. charts, data, statistics, etc.) where a short description is not possible. The best solution is to include a thorough description of the complex image in the content of the page, immediately before or after the image. If you don't want to add more content to your page, another preferred alternative would be to create another web page with just a description of the complex image and link to it near the image. Additionally, text descriptions of graphs and charts can help all students understand difficult concepts.

How alt text is written will vary depending on the type of image. Most screen reader software announces the presence of an image by appending a word such as "graphic" to the alt text, so using words such as "image" "graphic" and "photo" are unnecessary in the alt text, unless it helps to convey further meaning important for a user to know.

Consider this example which uses “Guide Dog and Man” as the alt text:

example of incorrect use of alt text

The alt text “Guide Dog and Man” is not effective if the intent is to show the dynamic action of guiding in the picture. In this situation a better alt text description is “A guide dog leads the way with her handler holding the guide harness in his left hand” as shown in the following example:

example of correct use of alt text

There is no need to include "image of," "picture of," or "photo of" in the alt text in this example because the screen reader will announce the presence of the image.

Additionally, images that contain text (as in a logo) should generally be coded to just include that text as the alt text.

Many images are used only for visual interest, they aren't meant to convey any meaning or important information. In this case, it is best to use what is called NULL alt text or empty alt text. This is done by entering two quotes ("") with no spaces in between in the alt text box.

So, how can you add alt text to images? Listed below are instructions on adding alt text in MS Word and PowerPoint documents as well as in Blackboard.

Add Alt Text to image in MS Word and PowerPoint 2010:

  1. PC users: right-click on an image
    Mac users: press control key and click on the image
  2. Select Format Picture
  3. Select the option for Alt Text
  4. Type your alt text in the description field
  5. PC users: Click Close
    Mac users: click OK
example of alt text in MS Word and PowerPoint

Add Alt Text to image in Blackboard:

You will find the Alt Text box in various places in Blackboard depending on what and where you are adding the image. Here are some examples:

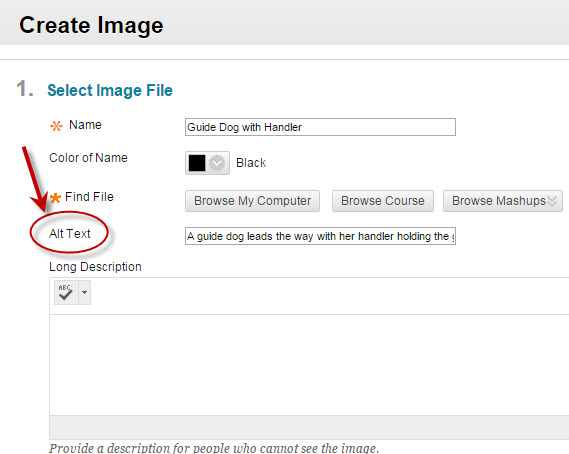
1. Create Image in Bulid Content:

example of alt text in Content Editor

2. Insert image in the Content Editor:

example of alt text in Content Editor

You will remove significant barriers for the visually impaired if you take these suggestions for adding alt text into consideration when creating course content. An added bonus is that if you take the extra step to include alt text when creating your course content you will be ahead of the game in the event you do have a visually impaired student.

Additional information about alt text can be found at:

Image credit:
"Students of the Educational Institute for the blind show how to use a computer as a learning aid" by Paul Kagame is licensed under CC BY-NC-ND 2.0

world wide web icon

Blackboard has a list of web browsers that are certified or compatible with the version of Blackboard we use here at XU. To avoid problems with Blackboard you should use one of the supported web browsers.

You can run the browser checker to see whether Blackboard supports your web browser and operating system.

Note: If using a supported web browser does not resolve your problem, you may require additional software to be installed. Information about the additional software can be found at the supported web browsers link.

Java Update Warning

warning sign

Windows PC users: DO NOT update Java on Windows PCs if you use Banner Client. Updating Java on Windows PCs may cause Banner Client to stop working. Blackboard should work with older versions of Java. Contact ITC if you have questions about Java updates and Banner Client.

Mac users: Updating Java on Macintosh computers will not affect the use of Banner Client.

Want more information?

Blackboard Learn SP 13 supported web browsers.
Explore Blackboard’s On Demand Learning Center.
Try these Blackboard How-To documents.
Visit the Blackboard FAQs for additional blackboard information
or schedule a one-on-one session, email, or
call Janice Florent: (504) 520-7418.