D2L (the company that owns Brightspace) uses Continuous Delivery to update our Brightspace system. The Continuous Delivery model gives us regular monthly updates allowing for incremental and easily integrated changes with no downtime required for our Brightspace system.
Our Continuous Delivery update occurs on the 4th Thursday of each month. D2L provides release notes to help users stay up-to-date with the changes.
This update from the June 2026/20.26.06 release was added to our system:
1) Brightspace – Rubric Icon in Assignments, Discussions, and Quizzes
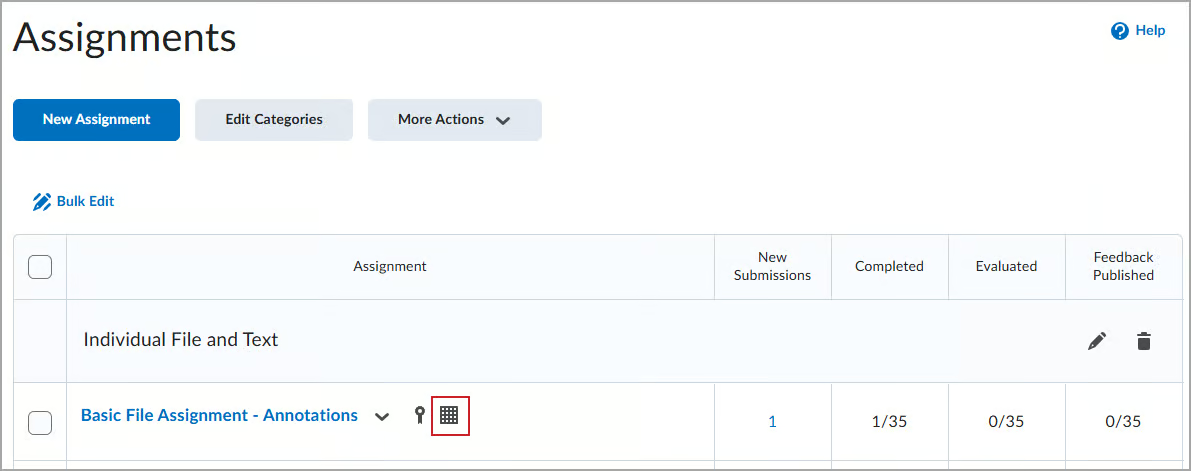
Instructors can now identify which Assignments, Discussions, and Quizzes include attached rubrics directly from list pages, helping instructors and administrators quickly audit assessments, confirm rubric setup, and reduce configuration errors.
When a rubric is attached to an activity, a rubric icon appears beside the item in the Assignments, Discussions, and Quizzes list pages. Written response questions in the Quiz Creation page also display a rubric indicator when a rubric is attached. Activities that include both rubrics and learning outcomes continue to display the rubric icon.
Rubric icon displayed beside assignment in Assignments list.
The rubric icon is informational only and does not link to the rubric, consistent with other informational icons such as release conditions and anonymous marking.
This feature implements the following PIE item:
D5453 (Rubric Used on Assignment or Discussion Indicator Symbol)
Note: Are you doing something innovative in Brightspace or perhaps you've discovered a handy tip? Share how you are using Brightspace in your teaching and learning in The Orange Room.
We opened this year's planning retreat the way I'd been turning it over in my head for weeks beforehand: not with the calendar, not with the budget, but with a question. Before we reviewed a single program or sketched out a single offering for next year, I asked everyone around the table to share one specific moment from the past year when they felt our mission was most present in their own corner of the work.
I'll admit I wasn't sure what I'd get. It's the kind of prompt that can produce a polite generality — I think we really lived the mission this year — and leave it there. But that isn't what happened. What came back were stories. Particular ones. A moment with a particular person, on a particular afternoon, that someone had clearly been carrying around for a while without quite having had the occasion to say it out loud.
I've been doing this work long enough that I didn't expect to be surprised by what I heard. And in a sense I wasn't. The three things I took away from that hour aren't new. I could have written them on a notecard two years ago. What was different was how clearly they came into focus when they arrived attached to real moments instead of stated as principles. So I want to set them down here, less as discoveries than as reminders.
The first is that we are a safe space. Our values statement has said as much since 2015: we commit to "a nonjudgmental, safe, collaborative, and supportive environment for faculty to think, experiment, work, and thrive." But hearing it in the stories reminded me how much of that safety is unglamorous. Sometimes the safety we offer is the safety to try a new assignment and have it flop. Sometimes it's the safety to admit you don't understand the new gradebook. And sometimes it's just the safety to close the door and vent for fifteen minutes before going back out to do the work. None of that shows up in an annual report. All of it matters.
The second is that this work is reciprocal. It's easy, in a center like ours, to slip into the posture of the people who know things helping the people who need to know them. The stories cut against that. We are not a one-way valve. The faculty member working through a teaching challenge with one of us is, at the same time, teaching us how teaching actually goes in their classroom. I find that worth holding onto, because it changes the spirit of the encounter. We're not dispensing. We're in it together.
The third is the one that points outward, and the one I keep coming back to. We can do more — and I think we should do more — to support educators across our region. Our mission is bound up in Xavier's larger commitment to a more just and humane society, and that commitment doesn't observe our building's walls. There are faculty at schools near us doing this work with far less support than we're fortunate to have, and the dissemination of what we learn is already written into our values. I don't have a fully formed plan yet. But I left the retreat convinced that the next chapter of our work is at least partly about the people we haven't met.
None of this required a retreat to know. But it did, apparently, require a room full of people willing to say here is the moment it felt real to me. I'm grateful they did. As we prepare for the coming year, I want to keep those three things close, not as a poster on the wall, but as a set of questions we keep asking ourselves: Are we still safe? Are we still learning? And are we reaching far enough?
Brightspace includes an email messaging tool that allows instructors to compose and send messages to individual students, groups, and to the entire Classlist. Brightspace does not receive email.
Within Brightspace, you can email students in your classes from the Classlist or by using the Email Tool. The primary difference is that the Email tool is a general composition interface, while emailing from the Classlist is a course-specific filtering tool. Clicking "Email" anywhere in Brightspace launches the Email tool. Sending email from the Classlist provides faster class roster population and has student privacy features.
Email Settings
You can update your Email Settings to automatically get a backup of your sent mail delivered to your personal email. From the Email Options you can:
Automatically send a copy of all outgoing email messages to yourself
Add an email signature to all email messages
The Account Settings option.
Email Options on the Email Settings page.
NOTE: Our University Communications Department has an email signature template you can use to create an email signature that has the University seal.
Sent Mail
Email you send within Brightspace goes to your Sent Mail folder. To view email you sent in Brightspace, simply click the Message Alerts (envelope) icon in the minibar, select Email, and click the Sent Mail button located above or to the right of the compose new message area.
The Email option of the Message Alerts icon.
The Compose New Message page of the Email tool, with the Sent Mail button highlighted.
NOTE: The Sent Mail folder allows you to confirm email was sent. Additionally, you can update your email settings and have Brightspace automatically send a copy of all outgoing email messages to you.
Note: Are you doing something innovative in Brightspace or perhaps you've discovered a handy tip? Share how you are using Brightspace in your teaching and learning in The Orange Room.
D2L (the company that owns Brightspace) uses Continuous Delivery to update our Brightspace system. The Continuous Delivery model gives us regular monthly updates allowing for incremental and easily integrated changes with no downtime required for our Brightspace system.
Our Continuous Delivery update occurs on the 4th Thursday of each month. D2L provides release notes to help users stay up-to-date with the changes.
Here are some of the updates in the May 2026/20.26.05 release that were added to our system this month:
1) Assignments – Improved Assignments Submissions layout with accessibility enhancements
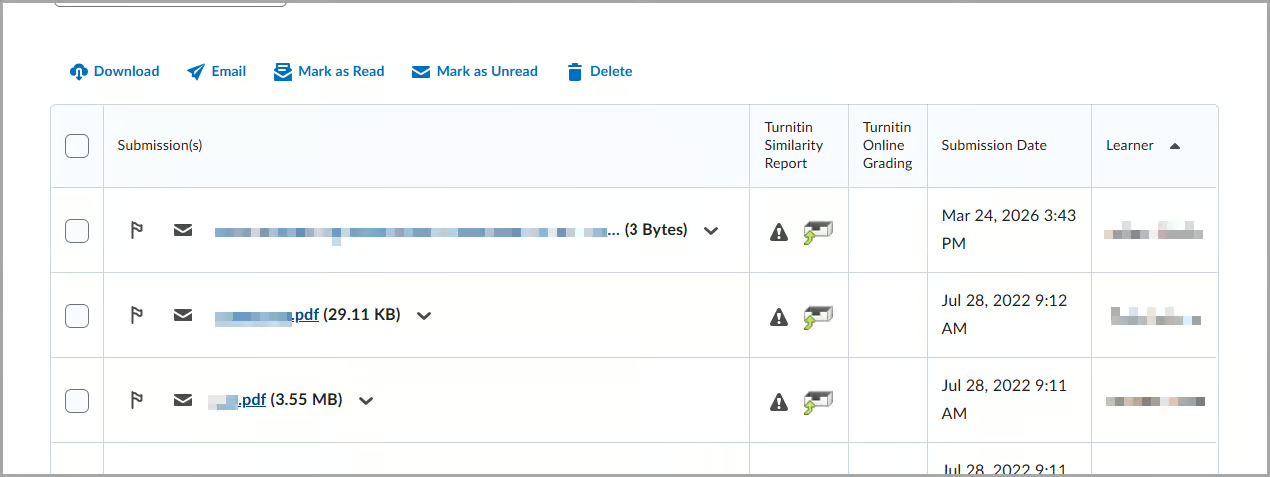
D2L refined the Assignments Submissions page by improving the layout in both standard and wide views, reducing the need for horizontal scrolling, and creating a cleaner, more consistent experience. All recent accessibility improvements remain in place.
This change improves the visibility of key information, such as submission dates and learner names, making the page easier to review.
Previously, the page layout with a long file could make it difficult to view key information without scrolling, especially when additional columns, such as Turnitin Similarity Report, were enabled.
The assignment submission page after this update.
This feature implements the following PIE item:
D13434 (Remove unnecessary scrolling from the Assignment submission page where Turnitin is enabled)
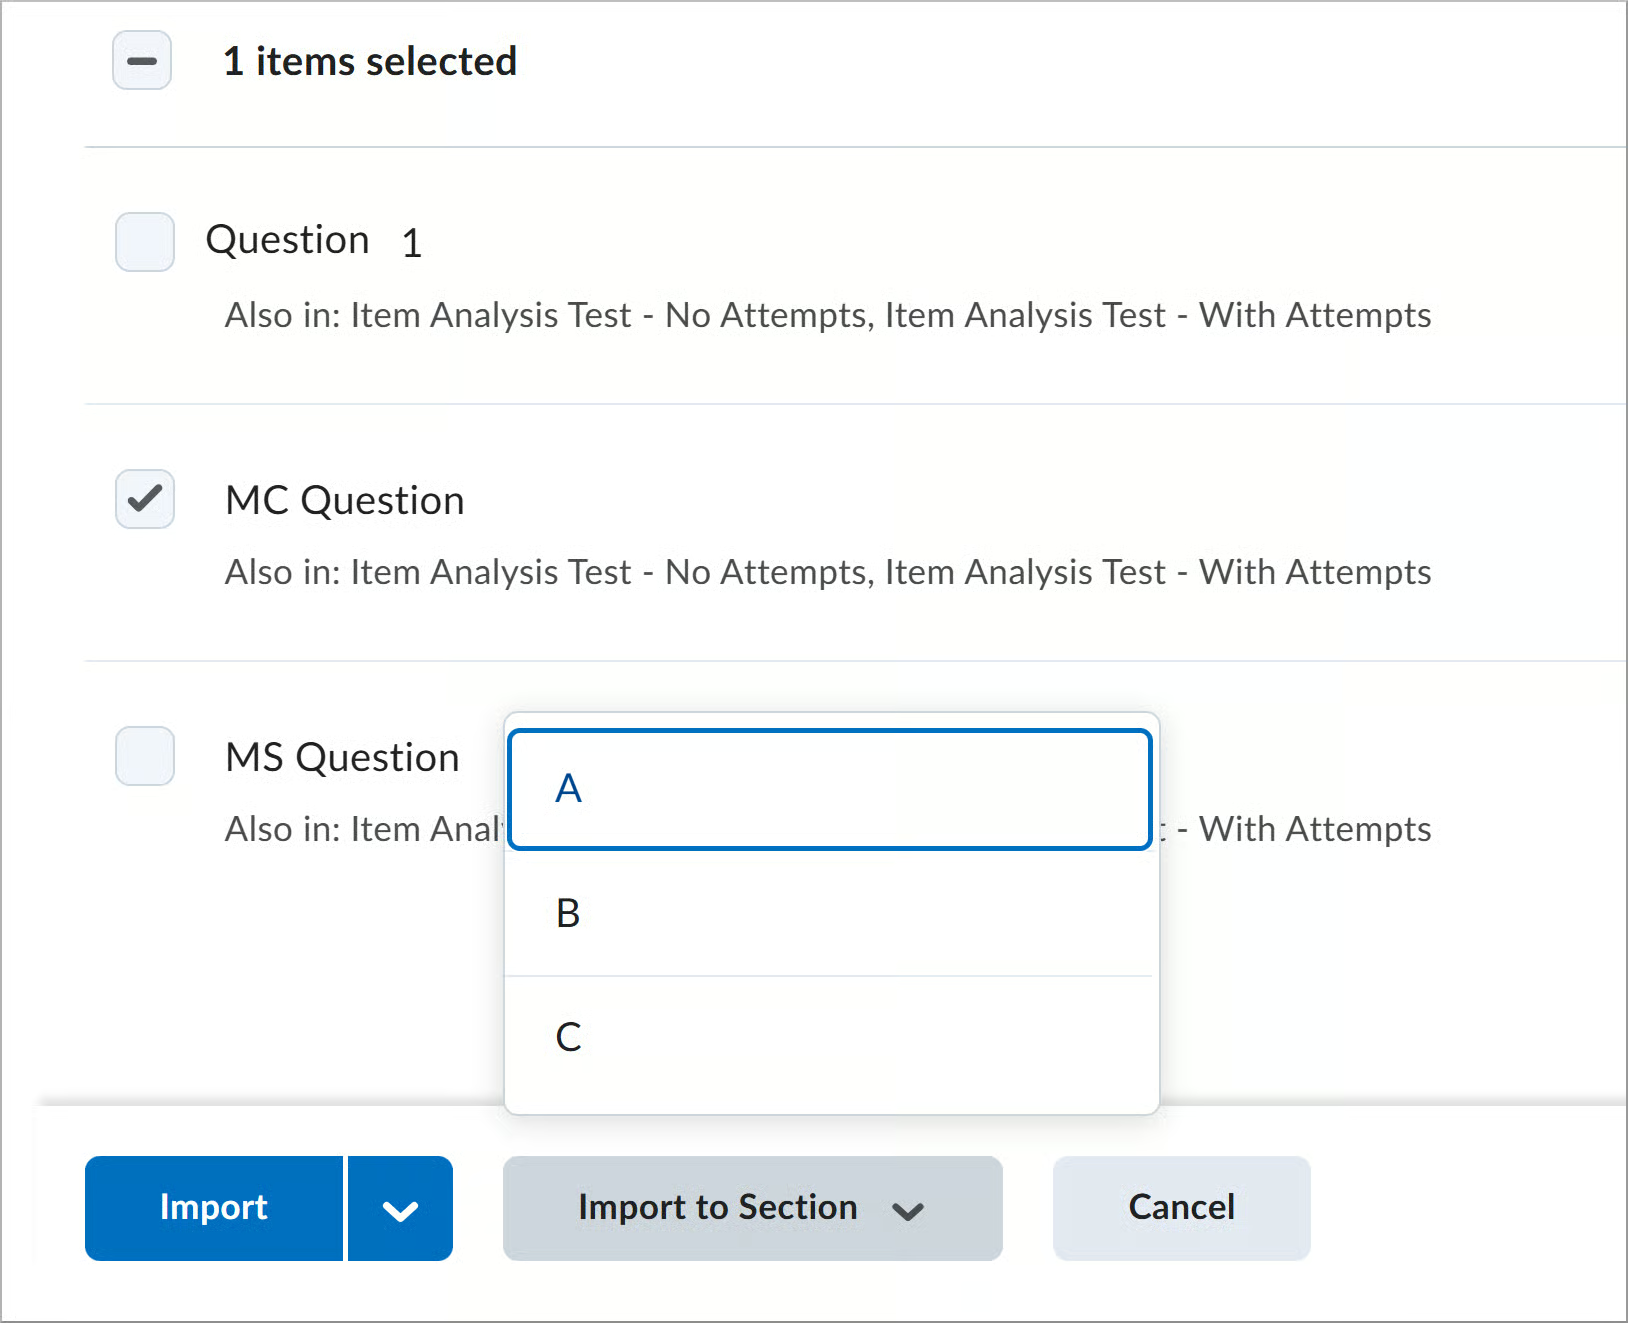
This update improves the consistency and usability of the Import options in Browse Question Library.
Available import options vary depending on whether the quiz contains sections:
The main Import action remains a button for quizzes with no sections.
The Import to Section option is now a separate button for quizzes with sections.
This change makes actions more visible and easier to access. Previously, the Import option appeared as a split button with multiple actions in a dropdown.
Before state of the Browse Question Library Import dialog, where instructors select questions and use the Import to choose placement in the quiz (top, bottom, or a specific section) from the dropdown.
New state of the Browse Question Library Import dialog for a quiz with no sections, displaying the import placement options.
New state of the Browse Question Library Import dialog, where the Import to Section button allows placement into specific sections.
Note: Are you doing something innovative in Brightspace or perhaps you've discovered a handy tip? Share how you are using Brightspace in your teaching and learning in The Orange Room.
Underground Kingdom (Choose Your Own Adventure #18) by Edward Packard, published by Bantam Books, 1983.
If you grew up reading Choose Your Own Adventure books like I did, you remember the opening line. Every single book started the same way: You are the hero of this adventure. Not a character the author invented. Not someone you were following from a safe distance. You. The book handed you the story and told you to drive.
Most job postings don't work that way. They're written like traditional novels: the plot is already determined, the role is already defined, and the search process is really just casting — finding the right person to play a part that someone else wrote. There's nothing wrong with that model. It works. It's how CAT+FD has always structured our Faculty-in-Residence positions, but this time around, we decided to try something different.
This time, you write the next chapter.
What's Different
The new Faculty-in-Residence position does not have a predetermined area of focus. That's a significant departure from how this position has worked in the past. Previous FIRs were appointed to support a specific programmatic need that CAT+FD had already identified — New Faculty Support, Service-Learning, Part-time Faculty Support — a focus area we chose in advance and then found the right person to lead.
This appointment inverts that. We are inviting applicants to propose an area of faculty development they are already passionate about, already engaged with, and genuinely well-positioned to support. CAT+FD will then shape the responsibilities of the appointment around the successful candidate's proposal.
What We're Hoping to Hear About
Journey Under the Sea (Choose Your Own Adventure #2) by R.A. Montgomery, published by Bantam Books, 1976.
We're genuinely open on this. The call for applications names a few possible directions — artificial intelligence in teaching and learning, faculty mentoring and peer support, student mentoring and advising as pedagogy, grant writing and management — but those are merely examples. They're areas that have come up in our recent conversations, not a ceiling on what we're willing to consider.
What we're actually looking for is a proposal that identifies a real need in the Xavier faculty community and makes a credible case for why you are the right person to address it. That means thinking seriously about what knowledge or experience you're bringing, what programming might realistically look like given the scope of the position, and who across campus would benefit.
The position is a 12.5% appointment with one course release per year, for a three-year term with the option to renew. It's designed to bring a faculty colleague into the work of CAT+FD in a meaningful, sustained way. The person we appoint will spend a few hours a week in the Center, attend staff meetings and our summer planning retreat, and take the lead on developing and running programming in their proposed area.
Who Should Apply
The Abominable Snowman (Choose Your Own Adventure #13) by R.A. Montgomery, published by Bantam Books, 1982.
The formal requirements are what you'd expect:
at least three years of full-time teaching at Xavier;
a record of engagement with CAT+FD;
evidence of scholarly activity; and
a collegial reputation that makes cross-disciplinary collaboration natural rather than forced.
Tenure is preferred, but not required.
But I want to speak past the formal requirements for a moment, because I think the person we're looking for might not immediately see themselves in a list of qualifications.
In Choose Your Own Adventure, the books were always careful to remind you that you weren't just in the story — you were driving it. That required a specific kind of reader: someone curious enough to explore, confident enough to make a choice, and self-aware enough to know something about what kind of adventure they wanted to go on.
That's who I'm hoping applies for this position. Not necessarily the person who has always wanted a faculty development role, but the person who has been quietly doing faculty development work for years without anyone giving it that name; the colleague other people come to when they're trying to figure out how AI is changing their classroom; the one who's been running an informal reading group; the person who thinks deeply about how we mentor graduate students or advise undergraduates through hard moments; the grant writer everyone asks for help and who's never had the support or the platform to do that work at scale.
If any of that sounds like you, we'd like to hear from you.
How You Can Apply
To apply, submit a letter of application that includes a detailed proposal describing your proposed area of focus, along with letters of support from your Department Head or Division Chair and your College Dean. We're accepting applications on a rolling basis throughout the summer, with a final decision before the start of the Fall 2026 semester.
If you have questions before applying, or if you want to talk through an idea before you've fully committed to a direction, reach out. That kind of conversation is part of what this process is supposed to feel like.
There are a lot of possible endings to this story. We're hoping you'll help us write a good one.
Instructors can grant quiz accommodations to learners through the Classlist tool. Instructors can assign accommodations to specific learners that apply across ALL quizzes instead of applying them on a quiz-by-quiz basis. The accommodations option allows the instructor to give the learner more time to complete quizzes at the course level.
The Edit Accommodations option in the Classlist
The Edit Accommodations dialog box
Once granted, the accommodations apply to all quiz activities in a course for that learner. The additional time can be applied in terms of quiz time multipliers (for example, 1.5 x quiz time) or +minutes (for example, an additional 30 minutes) on every quiz in a course.
Accommodations for Instructors:
An icon appears next to the learner’s name in the Classlist to indicate that the learner has an accommodation.
Instructors can filter the Classlist by Accommodations.
Instructors can also Print or Email a list of users with accommodations by adding the filter to those pages.
Accommodations for learners:
An icon appears next to learners’ own names in the Classlist to indicate they have an accommodation. To view accommodation details, learners can click My Accommodations from their learner context menu.
When commencing a quiz, the accommodation icon appears next to a learner’s quiz time to indicate that their accommodation has been applied. If a learner’s time accommodation has been overridden by a quiz-specific special access, this icon does not appear.
Classlist page highlighting the Learner has Accommodations icon
Learners can see accommodations reflected in the time allowed when taking quiz
Quiz-specific special access can overwrite an accommodation for any user on a quiz-by-quiz basis. When you overwrite an accommodation and then click Save, a warning describing the impact of overwriting the accommodation appears. Accommodations set for learners in Classlist are displayed in the Special Access for the quiz.
An example of how Accommodations set for a learner in Classlist will show up in the Special Access for a quiz
Note: Are you doing something innovative in Brightspace or perhaps you've discovered a handy tip? Share how you are using Brightspace in your teaching and learning in The Orange Room.
Did you know Special Access is an option available in the Quizzes tool that allows the instructor to grant learners special accommodations?
Special Access allows the instructor to assign specific learners a different set of quiz availability dates, late submission properties, and/or time limits. The instructor can change Start, End, and Due dates; the "Recommended Time Limit" and "Enforced Time Limit" timing settings; and the number of attempts allowed for a quiz to provide allowances for different needs of learners.
Add Special Access in the Quiz Creation Experience
Special Access options in Quizzes
Select Allow selected users special access to this quiz if you want to give certain students different submission options from the rest of the class.
Select Allow only users with special access to see this quiz if only certain students are allowed to see this quiz.
Click Add Users to Special Access to select students who will get the special access.
Note: Are you doing something innovative in Brightspace or perhaps you've discovered a handy tip? Share how you are using Brightspace in your teaching and learning in The Orange Room.
Although there are legal mandates requiring institutions of higher education to make educational materials accessible (e.g., the Americans with Disabilities Act and Section 504 of the Rehabilitation Act), accessibility is fundamentally just good design. Content that is accessible is better organized and therefore more usable by all. Accessible content renders properly on a wide variety of devices, it is easier to navigate, and it conveys information in a consistent, logical manner. Moreover, changes in how we view the content are occurring. More and more content is being displayed on mobile devices. For content to appear properly on all devices, it must be well designed.
In my recent series of accessibility tips, I identified some things you can do now to design with accessibility in mind as you are creating content and setting up your courses. Designing with accessibility in mind will save you some time in the event you do have a student with a disability. Remember accessible content is not only for the impaired.
Just in case you missed my accessibility series of blog posts, I provided links to them here:
Thursday, May 21st, is Global Accessibility Awareness Day (GAAD). GAAD aims to get you talking, thinking, and learning about digital access/inclusion and people with different abilities and talents.
Accessibility is about everyone. It is extremely important for students with disabilities to have access to accessible course content.
Video Notes is a built-in media recording tool in Brightspace that allows instructors and learners to record short videos with a webcam. This makes it easy to personalize the learning experience with short, video-based feedback, comments, or instructions. Video Notes can be added where video attachments are supported and when the Brightspace Editor’s Insert Stuff option is available.
People who are deaf or hard of hearing rely on captions and subtitles to understand video content. But there are a lot of other great reasons for using captions. For example, you may have some learners who choose not to use the sound or they cannot use it without disturbing those around them. You may have some learners who are not native in your language or who have trouble understanding you. Closed captions and subtitles will allow these individuals to receive your message and understand it.
Did you know you can generate automatic closed captions for newly created Video Notes AND you have the ability to manually add or edit closed captions for all previously recorded Video Notes?
Always verify your automatic captions. Automatically generated text often lacks punctuation and struggles with technical jargon, resulting in a "wall of text" that is difficult to follow. Inaccurate captions don't just hinder accessibility; they create a confusing experience for all viewers. Before you share your video, do a quick pass to correct misspellings and add basic sentence structure—it makes a world of difference for viewer comprehension.
Note: Are you doing something innovative in Brightspace or perhaps you've discovered a handy tip? Share how you are using Brightspace in your teaching and learning in The Orange Room.
Thursday, May 21st, is Global Accessibility Awareness Day (GAAD). GAAD aims to get you talking, thinking, and learning about digital access/inclusion and people with different abilities and talents.
Accessibility is about everyone. It is extremely important for students with disabilities to have access to accessible course content. This includes having access to accessible email.
In a series of accessibility related blog posts, I provide suggestions on how you can make small changes to make your materials accessible. This is the eighth tip in my series of accessibility related blog posts and it focuses on email.
Accessible emails ensure that everyone, including people using assistive technologies like screen readers or visual aids, can read and interact with your messages. Many of the same accessibility principles for content creation also apply to email.
Key Accessibility Best Practices
To make sure your emails are fully inclusive, follow these design and formatting rules:
Formatting: Break content into short paragraphs and use built-in heading styles (Heading 1, Heading 2) to help users scan your email.
Font and Size: Use legible, sans-serif fonts (like Arial, Calibri, or Helvetica) at 12pt or larger. Avoid using italics or complex decorative fonts.
Use Color Mindfully: Ensure there is high contrast between your text color and background. Never rely solely on color to convey information.
Hyperlinks: Write descriptive link text (e.g., use "Read the Accessible Email Guide" instead of "Click Here").
Avoid Tables for Layout: Tables should be avoided when you want to simply format other content (i.e., just to line things up neatly.)
Alt Text for Images: Always add descriptive alternative text for any images so screen readers can describe the visuals. Avoid sending "image-only" attachments, as they are unreadable to assistive software.
Send Email Within Brightspace
Email sent within Brightspace is sent using the Email tool. Within the Brightspace Email tool, you will use the Brightspace Editor to compose the body of your email. The Brightspace Editor has a built-in accessibility checker that makes it easy to check for issues or offer suggestions to fix identified accessibility issues.
Email with the Brightspace Editor's Accessibility Checker icon highlighted.
The Brightspace Editor's Accessibility Checker icon is highlighted in this Intelligent Agent's email message with a pop up window showing no accessibility issues detected.
You will remove significant barriers for users of assistive technology if you take these suggestions into consideration when creating email. An added bonus is that if you create your emails with accessibility in mind you will be ahead of the game in the event you do have a student who requires the use of assistive technology.


