D2L (the company that owns Brightspace) uses Continuous Delivery to update our Brightspace system. The Continuous Delivery model gives us regular monthly updates allowing for incremental and easily integrated changes with no downtime required for our Brightspace system.
Our Continuous Delivery update occurs on the 4th Thursday of each month. D2L provides release notes to help users stay up-to-date with the changes.
Here are some of the updates in the March 2026/20.26.03 release that were added to our system this month:
1) Awards – Longer text fields and preserved formatting for Badges and Certificates
o provide greater flexibility when creating Awards, instructors can now enter more detailed information in award text fields. This update increases character limits and preserves formatting, allowing clearer criteria, descriptions, and evidence to display consistently across Award views.
The following fields now support increased character limits:
Name (256 characters)
Description (512 characters)
Criteria (1000 characters)
Evidence (on issued award) (1000 characters)
Previously, text fields had lower character limits, which restricted context and detailed instructions. In addition, line breaks entered in these fields were not consistently preserved when Awards were displayed.
This feature implements the following PIE item:
D13138 – Awards description field
2) Classlist – export Classlist details to CSV and improved Print output
Instructors can now export Classlist details to CSV. The Export button enables full or partial user exports, mirroring Classlist view content for offline or administrative use.
Printed Classlists now include pronouns (if visible) and course identifiers, providing more complete context for in-person workflows and record keeping.
A new Export button appears on the Classlist page
This feature implements the following PIE items:
D9855 (Printing Classlist with pronouns)
D9391 (Classlist – allow export of pronouns)
D2124 (Export of Classlist)
D6948 (Classlist to Excel or CSV)
D2658 (Include course title with Classlist printout)
D9215 (Show course offering code on exported or printed Classlist)
D6667 (Classlist export)
3) Pulse – Engagement tracking improvements
This release improves the reliability, timeliness, and consistency of engagement tracking from Pulse. This enhancement ensures that engagement data more accurately reflects how learners are interacting with their courses across platforms.
Engagement related events in Pulse are now logged immediately. For example, when a learner taps on a course to open it, the Course Access details are sent to the database, the Last Accessed date in Classlist updates, and an Intelligent Agent that checks for course engagement knows not to notify the instructor. Downstream tools that report on learner engagement now represent both Web and Pulse activity equally.
Previously, Pulse events were sent asynchronously in batches, resulting in missing or late engagement tracking data and discrepancies between different tools.
Key improvements:
System Access Start events are sent immediately when the app is launched.
System Access Start events are decoupled from System Access End events.
When the app is in the background or idle, System Access End events are sent after 30 minutes of inactivity.
Course Access events are sent immediately when a user clicks into a course.
Note: Are you doing something innovative in Brightspace or perhaps you've discovered a handy tip? Share how you are using Brightspace in your teaching and learning in The Orange Room.
Thanks to those of you who attended our "Automate Communications Using Intelligent Agents" workshop. This workshop, the 3rd in our #LEX Advanced series, helps you to build on the skills you learned in the #LearnEverywhereXULA course and shows how you can use Intelligent Agents to automate communications and set your students up for success in your classes.
NOTE: This is a repeat of a workshop from 2021; however, as you know, Brightspace is a constantly evolving system, and this workshop is a refresher for those who previously attended and brings users up to date with changes/improvements to Intelligent Agents.
In case you missed the training session or if you attended the training session and want to recap what was covered, a copy of the workshop recording and resources referenced in the workshop are available. You can find the workshop recording and other resources in support of the workshop on the CAT+FD wiki.
Additionally, if you did not get the opportunity to earn a digital badge for participating in the workshop, it's not too late to earn that badge. We have a corresponding “Intelligent Agents” module in the #LearnEverywhereXULA (#LEX) course that you can complete to earn a digital badge for this topic. The badge will count towards your #LEX Advanced certification.
Pi (π) Day is celebrated on March 14th (3.14). Did you know the Brightspace Community has a PIE? Yes, there is a PIE (Product Idea Exchange) in the Brightspace Community. The PIE is a system that allows Brightspace users to share their suggestions on how to make Brightspace better. I invite you to take a few minutes to explore the Brightspace Product Idea Exchange (PIE).
We’ve put together this collection of PIE ideas you can consider upvoting so that we can add our voice to the community to make the Brightspace experience better. To get you started, here are links to articles on baking a better PIE and what makes an idea great. You can also search the PIE for ideas to upvote or submit your own idea to the PIE. Let us know if you submit your own idea to the PIE so that we can upvote it.
Note: Are you doing something innovative in Brightspace or perhaps you've discovered a handy tip? Share how you are using Brightspace in your teaching and learning in The Orange Room.
D2L (the company that owns Brightspace) uses Continuous Delivery to update our Brightspace system. The Continuous Delivery model gives us regular monthly updates allowing for incremental and easily integrated changes with no downtime required for our Brightspace system.
Our Continuous Delivery update occurs on the 4th Thursday of each month. D2L provides release notes to help users stay up-to-date with the changes.
Here are some of the updates in the February 2026/20.26.02 release that were added to our system this month:
1) Assignments – Group assignments now supported in Advanced Assessment
Group assignments are now supported in Advanced Assessment, enabling instructors to collaboratively evaluate groups of learners in Brightspace using Co-Marking, Delegation, and Multi-Evaluator capabilities. This update leverages the existing Groups tool, allowing learners to submit work as a team and receive shared feedback and grades through Advanced Assessment.
The feature introduces the following key improvements:
Seamless group evaluation: instructors can allocate evaluators to groups rather than individuals.
Consistent experience: interface terminology and visuals have been updated to reflect group workflows:
References to Learners are replaced with Groups, such as Allocate Evaluators to Groups.
Evaluation and feedback panel text reflects group-based workflows.
Improved workflow integrity: confirmation prompts prevent accidental evaluator setting loss when switching between group and individual assignments.
To enable group assignments, instructors must first create groups in Course Admin > Groups. Then, when creating an assignment, they must select Group Assignment under Submission & Completion.
Select Group Assignment under Assignment Type in the Submission & Completion settings to create a group-based assignment.
To trigger the Advanced Assessment workflow, select evaluators in the Evaluation & Feedback dropdown.
Click Select Evaluators under Evaluators in the Evaluation & Feedback settings to create an assignment.
The selected evaluators will be shown in the Evaluation & Feedback accordion where you can proceed to manage the group allocations.
Click Manage Allocations under Allocate Evaluators to Groups in the Evaluation & Feedback settings to review groups in the course and which evaluator will be assigned to evaluate each group.
Additionally, the following changes were made in the Manage Allocations table:
New dropdown options are available to assign evaluators to groups.
Group member names are displayed in a separate pop-out.
An example of group member names when viewed from the Manage Allocations dialog.Use the Manage Allocations dialog to set a default evaluator allocation method and adjust group assignments.
When sections are enabled, a Sections filter appears in the Manage Allocations dialog. Instructors in the selected section display a small tag under their names to indicate the applied filter, and only groups containing learners from the selected sections appear in the left-hand column.
When switching between individual and group assignments after evaluator allocations are made, existing allocations are removed. A confirmation prompt appears to alert users.
Notes:
Group assignments in Advanced Assessment are only supported in the new assignment creation page. Legacy assignment creation page users should follow the prompt to the new page, to create group assignments in Advanced Assessment.
Grades sync as before; individual overrides remain possible.
Group assignments are not currently supported in Quick Eval.
Switching between individual and group assignment types is disabled after learner submissions are made.
Previously, group assignments were not supported in Advanced Assessment. This update removes that limitation, enabling the use of Co-marking, Delegation, and Multi-evaluator features for groups.
Brightspace now provides clearer and more consistent error messages when learners attempt to submit file assignments using unsupported file types. These improvements help learners understand which file types are allowed and make it easier to correct submission issues.
The updated messaging appears across assignment submission workflows and Activity Display, ensuring learners receive appropriate guidance based on the context of their submission.
Updated error messages for file submissions
When a learner attempts to upload a file from Google Drive, One Drive or Locker with a restricted or unsupported file extension, Brightspace now displays more specific messages depending on the number of restricted file types configured for the assignment.
Assignment submission page
If fewer than seven file types are restricted, learners see a message listing the allowed file extensions, such as:
Your work could not be submitted. You can only submit files with the following file extensions: PDF, DOCX, or TXT.
If seven or more file types are restricted, learners see a simplified message:
Your work could not be submitted. You can only submit files with allowed file extensions.
For file assignments, learners can now also see the list of Allowed File Extensions. This list previously appeared only for File and Text assignments and is now available for File assignments as well.
Improved feedback in Activity Display
In Activity Display, learners now receive clearer visual indicators when uploaded files are not allowed:
If a learner uploads files with unsupported extensions, Activity Display identifies which uploaded files are not allowed.
If a file has no extension or the file type cannot be detected, Activity Display notifies the learner that the file type is unsupported.
If five or more files with unsupported extensions are uploaded, Activity Display displays a consolidated message indicating that multiple files are not allowed.
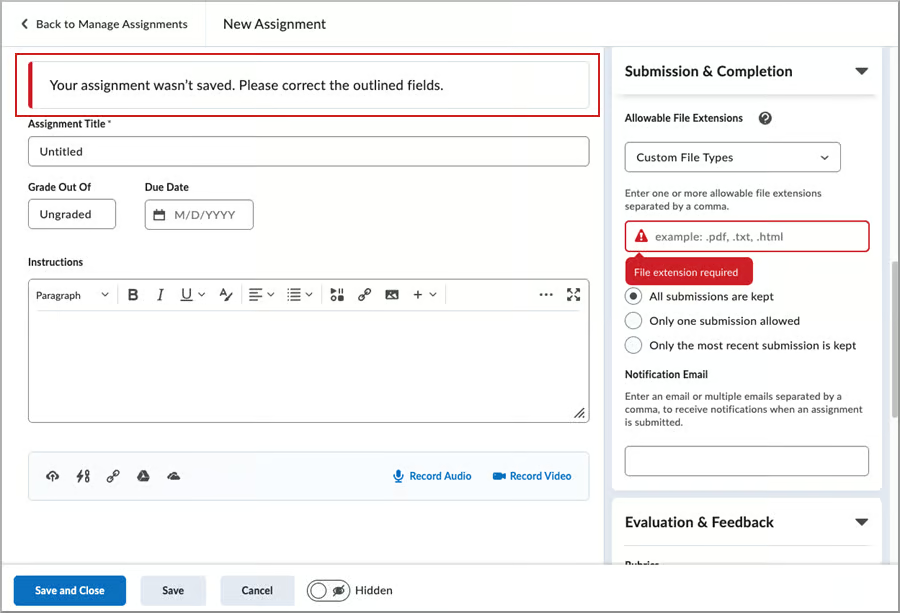
Improved validation when configuring Custom File Types in Assignment Creation
When instructors set Allowable File Extensions to Custom File Types during assignment creation, Brightspace now requires at least one file extension to be entered before the assignment can be saved.
If the field is left blank, Brightspace displays a clear inline error message and prevents the assignment from being saved. This improvement helps instructors avoid invalid assignment configurations and reduces submission issues for learners.
New Assignment page displaying a validation error when Custom File Types is selected without specifying at least one allowable file extension.
Note: These changes improve messaging only and do not alter which file types are allowed for an assignment.
3) Class Progress – User progress for Content charts now loads asynchronously
The completion progress bars for the Content Completed and Content Visited charts now load asynchronously as instructors scroll down the Class Progress page. Progress details appear for each user as they come into view, allowing the page to continue loading smoothly regardless of the number of users or content objects being calculated.
The d2l.Tools.ClassProgress.AsyncContentChartsCount (Org) configuration variable determines the threshold for the number of content objects that triggers content charts to load asynchronously. The default value is 50 content objects and can be increased to a maximum of 1,000.
Completion progress bar charts load asynchronously.
Previously, courses with a large number of users or content objects could experience page timeouts when viewing the Content Completed or Content Visited columns in Class Progress.
4) Grades – Improved navigation within the Enter Grades page
The Enter Grades page now offers improved horizontal navigation, making it easier to work with large gradebooks. Instead of relying on a horizontal scroll bar at the bottom of the page, instructors can use navigation arrows on either side of the gradebook, along with a scroll bar at the bottom of the grid, to navigate across grade columns.
This update also improves how dropdown menus behave, preventing them from appearing underneath other fields such as user names.
Use the left and right arrows to scroll horizontally and view additional grade columns in the Enter Grades table.
Previously, horizontal navigation relied on a scroll bar at the bottom of the page, which was not always visible unless users scrolled down.
Note: Are you doing something innovative in Brightspace or perhaps you've discovered a handy tip? Share how you are using Brightspace in your teaching and learning in The Orange Room.
This year marks the 36th anniversary of the Americans with Disabilities Act (ADA), a law ensuring that people with disabilities have the same rights and opportunities as everyone else. In education, accessibility is about more than compliance; it’s about equity and inclusion.
According to a U.S. Government Accountability Office (GAO) report, about 21% of college students report having a disability, including visual, hearing, cognitive, and motor impairments. Many more choose not to disclose their disability and often struggle quietly through their coursework.
Creating Accessible Learning Environments
Accessible course materials give all students a fair opportunity to succeed. Every day, some students encounter barriers such as:
Images or videos they cannot see
Documents that screen readers cannot interpret
Audio they cannot hear
Websites or platforms that cannot be navigated without a mouse
Chances are, you already have students in your courses who face these challenges—even if they haven’t disclosed them.
Upcoming ADA Compliance Requirements
In 2024, the Department of Justice updated Title II of the ADA to require all publicly funded organizations, including colleges and universities, to conform to the Web Content Accessibility Guidelines (WCAG) developed by the World Wide Web Consortium.
Most institutions must comply by April 24, 2026.
Smaller municipalities and districts (under 50,000 people) have until April 26, 2027.
Non-compliance can result in lawsuits and significant penalties—so now is the time to ensure your materials meet accessibility standards.
While Brightspace is accessible to persons with disabilities, uploaded content may not be. Instructors should make a conscious effort to make sure content is accessible.
How Brightspace Supports Accessibility
Our Brightspace Learning Management System (LMS) is built with accessibility in mind and meets WCAG requirements. However, while the platform itself is accessible, uploaded course content may not be. It’s up to instructors to make sure their materials—documents, media, and links—are accessible to all students.
Practical Steps You Can Take
Making accessible content doesn’t have to be complicated. A few simple practices go a long way:
Use clear headings and descriptive hyperlinks
Add alternative text (alt text) for all images
Provide captions for videos and transcripts for audio
Ensure documents (especially PDFs) are screen-reader friendly
Avoid using color alone to convey meaning
Even small efforts make a big difference. Not only will your materials support students with disabilities, but you’ll also improve the learning experience for everyone. Plus, if you reuse your course content each semester, accessibility updates you make now will continue to pay off in the future.
In an upcoming series of blog posts, I will go into more detail on the things you can routinely do when you create content and setup your Brightspace courses to make them accessible.
Thanks to those of you who attended last week's "Set Students Up for Success Using Release Conditions" workshop. This workshop, the 2nd in our #LEX Advanced series, helps you to build on the skills you learned in the #LearnEverywhereXULA course and shows how utilizing Release Conditions can set your students up for success in your classes.
NOTE: This is a repeat of a workshop from 2021; however, as you know, Brightspace is a constantly evolving system, and this workshop is a refresher for those who previously attended and brings users up to date with changes/improvements to the Release Conditions system.
In case you missed the training session or if you attended the training session and want to recap what was covered, a copy of the workshop recording and resources referenced in the workshop are available. You can find the workshop recording and other resources in support of the workshop on the CAT+FD wiki.
Additionally, if you did not get the opportunity to earn a digital badge for participating in the workshop, it's not too late to earn that badge. We have a corresponding “Release Conditions” module in the #LearnEverywhereXULA (#LEX) course that you can complete to earn a digital badge for this topic. The badge will count towards your #LEX Advanced certification.
I am writing this blog post as a follow up to my recent announcements blog post. ICYMI, you can find the blog post here: Brightspace Tip #561: Announcements.
Announcements can help boost learner engagement by providing regular and timely communications to all learners enrolled in a course. This blog post focuses on pinning, reordering, and copying announcements.
Pin Announcements
Pinning an announcement to the top of the Announcements widget keeps critical information immediately visible to students, preventing important updates from getting buried as new, less urgent posts appear. This feature ensures key messages remain prominently displayed on your course homepage. Multiple announcements can be pinned, but the most recently pinned message will appear at the top of your list.
Brightspace announcement with the option to Pin to top highlighted.Brightspace announcement with Pinned highlighted.
NOTE: While pinned announcements will appear at the top of the Announcements widgets, learners can dismiss announcements, including pinned announcements.
Unpin Announcements
There is no expiration date to remove a pinned announcement. You have to manually remove the pin. However, when you set an end date for a pinned announcement, the pinned announcement will not appear in the learners announcement widget past its availability end date.
Brightspace announcement section with option to Unpin highlighted.
Reorder Announcements
Did you create or update an announcement and need to move it to the top? Did you push back an assignment and want to change the order of your announcements? If so, you can reorder your announcements!
Brightspace announcement tool with the More Actions menu and the Reorder option highlighted.Brightspace reorder announcement page with the sort order column highlighted.
Copy Announcements
With just a few clicks you can quickly make a copy of a course announcement in the same course as well as copy the announcement to other Brightspace courses. This feature is built right into the shortcut menu. You don't have to copy and paste to duplicate the announcement.
Brightspace announcement section with the options to Copy and Copy to Other Courses highlighted.
Note: You must be enrolled in the course you copy from (source) and the courses you copy to (destination).
You can select the following options when copying announcements:
Copy announcements to other courses in draft state, so you can publish the announcement content from within the destination course later.
Publish copied announcements at the same time you copy it, bypassing the draft stage.
Attributes That Are Copied:
Headline
Display Author Information
Content: Includes associated files, such as inserted images.
Start and End Date: Start and end dates are not automatically offset. Dates remain the same as in the original course.
Attachments
Pin State
Attributes That Are Not Copied:
Assignments
Quick links to activities
LTIs
Release Conditions
Send Email Copy settings
Follow these steps to do it.
Pin an Announcement:
From the Announcements widget or the Announcements tool, select the dropdown arrow beside the announcement’s title, then select Pin to top.
A pin icon will appear beside the posted date.
Unpin an Announcement:
From the Announcements widget or the Announcements tool, select the dropdown arrow beside the announcement’s title, then select Unpin.
The pin icon will be removed.
Reorder Announcements:
From the Announcements tool, click on More Actions, then select Reorder.
Change the sort order number for the relevant announcements.
Click Save.
Copy Announcements:
From the Announcements widget or the Announcements tool, select the dropdown arrow beside the announcement’s title, then select Copy or Copy to Other Courses and follow the prompts.
Note: Are you doing something innovative in Brightspace or perhaps you've discovered a handy tip? Share how you are using Brightspace in your teaching and learning in The Orange Room.
"Drip-feeding" is a term you will likely hear in association with online and hybrid learning. While the term "drip-feeding" is new to many people, most are familiar with the concept.
Drip-feeding is "scheduled lesson delivery." Essentially, instructors can determine when they want certain content in their courses to become available. Instructors can configure their course content and then set-up the sequential delivery of that content. Once set-up, the Learning Management System (LMS) will auto-drip the content to students without any more work by the instructor.
Utilizing date/time restrictions allow instructors to create content at a time that is convenient to them and make it visible to students at the appropriate time. This can be very handy because instructors can set-up their course content well in advance of when they want it to be available to their students. For example, create all the course content at the beginning of the semester, set the date/time restrictions, and then let Brightspace auto-drip the content.
The availability dates in Brightspace control when items are available to students. There are three types of availability dates, they are:
Start dates: These dates specify when a student can see the item. Students will see that the item exists, but they cannot open it beforehand.
Due dates: These dates specify when a student should complete an item. The dates will appear in the course calendar and students will be able to see and submit their work after the date has passed.
End dates: These dates restrict access to the item. They remove all access once the date has passed.
Some instructors may be hesitant to set date/time restrictions for the entire semester because assignment dates/times may need to be adjusted as the semester progresses. This means, the instructors would have to go into the content items to adjust the dates/times when necessary. The Manage Dates tool can simplify this process. The Manage Dates tool allows instructors to easily change due dates and availability dates at one time (all on one page). The Manage Dates tool will save instructors some time as they will not have to edit each individual item to adjust the dates/times.
Drip-feeding works well for courses that contain complex material that students need time to digest and complete. In this case, drip-feeding content may help your students not to feel overwhelmed.
Note: Are you doing something innovative in Brightspace or perhaps you've discovered a handy tip? Share how you are using Brightspace in your teaching and learning in The Orange Room.
D2L (the company that owns Brightspace) uses Continuous Delivery to update our Brightspace system. The Continuous Delivery model gives us regular monthly updates allowing for incremental and easily integrated changes with no downtime required for our Brightspace system.
Our Continuous Delivery update occurs on the 4th Thursday of each month. D2L provides release notes to help users stay up-to-date with the changes.
Here are some of the updates in the January 2026/20.26.01 release that were added to our system this month:
1) Announcements – Images appear in emailed Announcement notifications
When instructors create an announcement (or administrators create a global announcement) which includes in-line images, any instant notification or emailed copy of that announcement now includes those images in the body of the email. Previously, only images added as file attachments to the announcement were included with the notification email, and in-line images were not shown.
Note: This update applies only to images. Videos embedded in announcements are not included in emailed announcement notifications.
This change ensures that learners who rely on email notifications can see the same visual content that appears in the original announcement, helping them notice important information that may have previously been missed when images were omitted from the email version.
This feature implements the following PIE items:
D7210 (Images in announcements do not appear in the email-version of the notification)
D12152 (Permit images to be sent in an email notification for an announcement)
D7939 (Include images in Brightspace-generated email of Announcements - partial release; videos are not included)
As part of D2L’s ongoing commitment to accessibility and inclusive design, with this release, they have made several updates to enhance the experience for users relying on assistive technologies.
The Submissions page in Assignments: The dropdown menus for submissions, feedback, and results per page now include accessible labels. Previously, these menus only had titles, which some screen readers could miss. This change ensures that all users can access and understand these controls.
The Submissions view in Quick Eval: The number of search results returned is now read aloud by assistive technology, making it easier for users to understand the scope of their results.
Quick Eval interface displaying filtered submission results, with the number of returned results now read aloudQuick Eval interface showing filtered activity results based on a search query, with the number of returned results now read aloud
3) Awards – Increased flexibility in Awards text fields
To improve localization and language flexibility, administrators and instructors can now personalize certificates in the Awards tool using new replacement strings. These strings populate dates in a short YYYY-MM-DD format, which provides more consistent rendering across multilingual certificate templates.
Previously, existing date replacement strings used long-form formats. This caused issues when certificates were created in one language and the date string rendered in another, often breaking formatting. The new short-form format resolves this issue.
The following replacement strings are now available:
{CourseStartDateShort}: Inserts the course start date.
{CourseEndDateShort}: Inserts the course end date.
{AwardDateShort}: Inserts the award issue date.
{AwardExpiryDateShort}: Inserts the award expiry date.
4) Quizzes – Single Session Quiz
Instructors can now require learners to complete a quiz within a single Brightspace login session, helping maintain academic integrity. When this setting is enabled, learners cannot resume the quiz using another browser session. For example, if a learner starts a quiz on a laptop, they cannot continue the quiz on another device such as a smartphone or tablet.
When this configuration variable is enabled, instructors can navigate to the Availability Dates & Conditions section while creating or editing a quiz and select Lock each attempt to a single login session.
From the quiz’s Availability Dates & Conditions section, select Lock each attempt to a single login session to restrict attempts to one active session
IMPORTANT:
This setting only restricts access to the quiz. It does not prevent learners from having multiple active sessions in Brightspace.
While this feature enhances academic integrity, you should use it with caution. We suggest reserving this option for live testing environments where you are available to assist immediately. If a student experiences a technical glitch or a dropped connection, they will be unable to resume the quiz attempt without your direct intervention to reset the session restriction.
This feature implements the following PIE item:
D11297 (Prevent multiple sessions taking one quiz attempt simultaneously)
Note: Are you doing something innovative in Brightspace or perhaps you've discovered a handy tip? Share how you are using Brightspace in your teaching and learning in The Orange Room.
This weekend's forecast of wintry weather and freezing rains in our area should be a reminder that course delivery is vulnerable to unplanned events. Potential interruptions to class activities include but are not limited to natural disasters, widespread illness, acts of violence, planned or unexpected construction-related closures, severe weather conditions, and medical emergencies.
Here are a few things you can do in Brightspace to help you prepare should the need arise.
Note: Are you doing something innovative in Brightspace or perhaps you've discovered a handy tip? Share how you are using Brightspace in your teaching and learning in The Orange Room.


