Skip to content

Turnitin document viewer

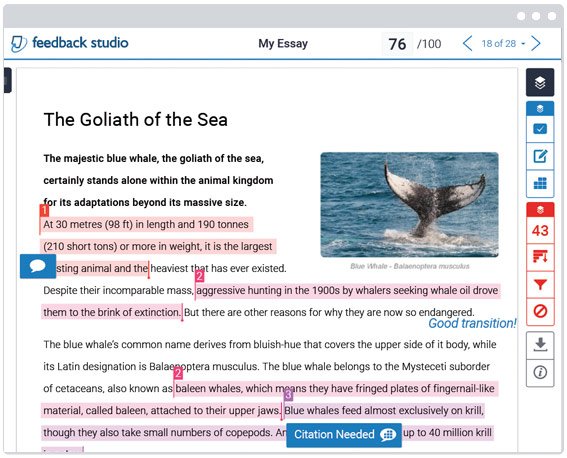
The new Turnitin Feedback Studio is currently available with our Blackboard integration. Turnitin Feedback Studio offers all the functionalities of Turnitin, but with a simplified, more intuitive interface. Turnitin Feedback Studio’s simplified, more intuitive user experience brings together the grading, feedback, and similarity checking services in one view. Additionally, the contextual marking approach of the iPad app allows educators to click anywhere on the paper and leave a comment, QuickMark Comment, or text comment at any time.

Turnitin Feedback Studio vertical toolbar

In the Feedback Studio interface, the GradeMark and Originality Report tools are integrated in one vertical toolbar. New features include the ability to view the Originality Report with different filters turned off and on.

Ultimately, Turnitin Feedback Studio will make it faster and easier than ever to promote academic integrity, provide actionable feedback, and evaluate student learning.

You will see the new interface when you open a student’s paper in Turnitin. Your students will also experience this new and improved interface when viewing Similarity Reports and receiving feedback.

Want more information?

Turnitin Feedback Studio Walkthrough video [2:56]
Feedback Studio Instructor User Manual
Feedback Studio Student User Manual
Try these Blackboard How-To documents.
Check out help for instructors at help.blackboard.com.
Explore Blackboard’s On Demand Learning Center.
Visit our Blackboard FAQs for additional blackboard information
or schedule a one-on-one session, email, or
call Janice Florent: (504) 520-7418.

wall of binary numbers with robot in forground

As an instructor, you want to be confident that your course is well designed and functions as intended—before your students see it.

With Student Preview, instructors can navigate their courses just as their students would. While in Student Preview mode, instructors can perform student activities such as:

  • Submit assignments
  • Take tests
  • Create blog and discussion posts
  • Create journal and wiki entries
  • View student tools, such as My Grades

You can use Student Preview to review the course content and validate the course behaviors, such as those that control the availability of course content or require a particular interaction from the student to be triggered.

The Student Preview feature provides a new button that appears in the breadcrumb bar next to the course Themes and Edit Mode buttons and is shaped like an eye.

Note: Now with the new Student Preview feature available, test students are no longer needed. The “Add Test Student” course tool was removed as well as all test student accounts.

Follow these steps to do it.

To Enter Student Preview Mode:

  1. Select the Enter Student Preview function. You will see a student preview bar at the top of every page letting you know you are in student preview mode.

student preview button

To Exit Student Preview Mode:

  1. Press the Exit button on the student preview bar that appears at the top of the page.

exit student preview button

Want more information?

Watch a video about Student Preview [2:23].
Using Student Preview.
Try these Blackboard How-To documents.
Explore Blackboard’s On Demand Learning Center.
Visit our Blackboard FAQs for additional blackboard information
or schedule a one-on-one session, email, or
call Janice Florent: (504) 520-7418.

Photo credit | CC BY-NC 2.0

1

By Jay Todd

Photo of a parking meter that says, FAIL, instead of 0.
"Parking Meter Fail" by Jeramey Jannene / CC BY 2.0

I'll be honest: I can't remember the last time I penalized a student for turning in a late assignment. I used to be very strict about this. I was taught, in fact, to be very strict about deadlines. Make your policy clear in your syllabus and never deviate from it, I was told. Don't let the students take advantage. So I used to deduct one letter grade for each day a major assignment was late. Small assignments couldn't be late at all.

At some point though, I started to wonder about the effectiveness of this approach. Mostly, I started to worry, as a writing teacher, that I was hindering good writing by making the deadline some important. A few times, because of my clearly stated policy, I had to give an A paper -- I mean a truly excellent paper -- a C, simply because it was late.

I still have a policy in my syllabus that says, clearly, that a deadline is a deadline, but I follow that up with a statement that says, "If you anticipate having difficulty meeting a deadline, please speak to me about it." Basically, to an astute reader, I'm negating my policy right there.

Ellen Boucher discusses this a recent article in the Chronicle of Higher Education: It's Time to Ditch Our Deadlines. Her new policy is that all assignments come with an automatic two-day grace period. If a student needs still more time, all that's required is a meeting. As a result, she says, she's seen higher quality work and less stress from her students. She makes a good argument, especially by focusing on how this helps under-prepared college students.

I should say though that so far, I've only taken this approach with big assignments -- essays and research papers. Daily homework, quizzes, and such still come with fairly rigid deadlines.

Download Conversation #46

Regan Gurung

A conversation with Dr. Regan Gurung of UW-Green Bay on teachers as superheroes.

Dr. Regan Gurung is a Professor of Human Development and Psychology. He was born and raised in Bombay (India), got a B.S. at Carleton College (MN) in Human Development, then spent 5 years in Seattle at the University of Washington. After getting his Ph. D. (Social/Personality), he did postdoctoral work at UCLA (Health Psychology). Then landed in Wisconsin, Green Bay. He has served in a number of roles at UW-Green Bay including as Chair of Human Development and Chair of Psychology, as Associate Dean of Liberal Arts and Sciences, and as co-director of the UW-Green Bay Teaching Scholars Program. He is Past-President of the Society for the Teaching of Psychology (STP) and Past-President of the Bay Area Community Council (BACC).

Links for this episode:

...continue reading "Conversation #46: Regan Gurung on Teachers as Superheroes"

town crier making announcement

Announcements provide timely information for your students about class activities. Announcements are the ideal way to post time-sensitive material. The announcement area can be used to remind students of assignment and/or test dates, post changes to the course, announce upcoming events (such as a guest speaker), etc. You may direct students to a particular section of your course from an announcement. You also have the option to broadcast announcements to your students' email. That means the announcement appears on Blackboard, and also is sent to students' email.

You may post multiple announcements when setting up your course and time them to be released separately by choosing staggered future display dates. For example, you know now that you want to post an announcement about the midterm exam and another about the final. Write both announcements now, but set the midterm announcement to display the week before the midterm and the final exam announcement to display a week before the final. Students will not be able to view either announcement until their assigned display dates.

Follow these steps to do it.

  1. On the Control Panel, go to [Course Tools] and select [Announcements].
  2. Select [Create Announcement].
  3. Type a subject and message for your announcement.
  4. Choose to restrict the announcement by date or not.
  5. Select the Email Announcement check box to send students an email containing the announcement.
  6. Select [Submit].

Want more information?

Creating Announcements [video]
Try these Blackboard How-To documents.
Explore Blackboard’s On Demand Learning Center.
Visit our Blackboard FAQs for additional blackboard information
or schedule a one-on-one session, email, or
call Janice Florent: (504) 520-7418.

1

by Janice Florent

pile of letters with two feet sticking out and you've got mail on computer monitor in the background

Unlike face-to-face instructors, online instructors are generally inundated with questions from students by way of email messages. It doesn’t take long for an online instructor to feel like they are drowning in student emails.

In a recent eLearning Industry article, Dr. Liz Hardy provided five tips to help you manage student email to avoid a flood of student email. Those tips are:

1. Make communication time frames clear.

Tell your students what to expect when communicating with you. When your students understand your communication rules, they are more likely to work within those rules.

2. Prevent unnecessary student emails in the first place.

Set up your Blackboard course to be as learner-friendly as possible. If your students can find the information they need without extensive searching, they’re less likely to email you for help with simple questions. By encouraging self-directed learning, you find that student email more often relates to valid questions - rather than multiple queries about when the next assignment is due.

Consider using the “three before me” rule, which pushes the responsibility of locating an answer to frequently asked questions to the student. The student must prove to the professor that he/she has attempted to obtain the answer from three different sources prior to contacting the professor.

Additionally, you can minimize emails by utilizing Blackboard for assignment collection. The Blackboard assignment tool is an efficient way to manage and collect your student’s individual and group assignments digitally and can help to unclutter your inbox.

3. Scan your inbox before you answer even one student email.

Scan your inbox first. Are there messages from colleagues or administrators you need to answer first? Is there a reply from a student you’ve been waiting to hear from on an urgent issue? Deal with those messages first. Then you can look for patterns – are there any students who have sent you several emails since you last checked? Try reading email in reverse date order. You may find the student has answered their own question. In this case you can send one email back to the student with a single-line response.

4. Don’t multi-task.

It’s actually more efficient to deal with each student query in full, completely, and then move onto the next. What seems like saved time through multi-tasking can actually lead to a lot of backtracking and cross-checking, as you try to make sure you’re matching the right answer to the right student.

5. Answer student email in blocks.

Check your email messages two or three times a day, in blocks. Avoid checking at other times. Mute your speakers so you won’t hear that demanding bleep every time email arrives in your inbox.

These practical approaches will help you take control of your inbox, and get on with your teaching day. If you would like more information, read Dr. Hardy’s article "5 Ways To Survive A Student Email Avalanche."

image showing various disasters

Course delivery is vulnerable to unplanned events. Potential interruptions to class activities include but are not limited to natural disasters, widespread illness, acts of violence, planned or unexpected construction-related closures, severe weather conditions, and medical emergencies.

Here are a few things you can do in Blackboard to help you prepare should the need arise.

Additionally, you should consider developing an instructional continuity plan to help you to be ready to continue teaching with minimal interruption. More information about instructional continuity plans can be found on our Instructional Continuity web page. There you will find planning guides, resources, and a link to our September 2015 Instructional Continuity workshop presentation.

Want more information?

Get more information about instructional continuity plans.
Sign up for Blackboard workshops or request one-on-one help.
Try these Blackboard How-To documents.
Explore Blackboard’s On Demand Learning Center.
Visit our Blackboard FAQs for additional blackboard information
or schedule a one-on-one session, email, or
call Janice Florent: (504) 520-7418.

Image credit: "The threat of disasters is real" by jflorent is licensed under CC BY-NC-SA 4.0

by Janice Florent

syllabus graphic

In a recent Inside Higher Ed blog post, Travis Grandy, PhD student in Composition and Rhetoric at the University of Massachusetts Amherst, writes,

Do you ever feel like you want to get more out of your syllabus? Sure, it plays center-stage during the first day of class, but does it really have to end there? Perhaps it’s a matter of presentation.

He goes on to express his frustration of writing a carefully detailed syllabus only to see his students tuck it away never to be seen again; assuming they read the syllabus in the first place.

After seeing an article on creative approaches to the syllabus, Travis felt his syllabus had a design problem as his syllabus had over the years ballooned to over two thousand words, single-spaced, with a few bullet points.

Travis redesigned his syllabus to not only make the content more useful for his style of teaching, but also easier to use and visually engaging. His revised syllabus ended up being full-color, using illustrations and visual metaphors to convey content, and was intentionally designed help students more easily find the information and get excited about the core purposes of the class. It is important to note that to make his syllabus accessible, Travis made his syllabus available in other formats as well.

Travis’ strategies for a syllabus redesign and ways to better integrate the syllabus into teaching and learning are:

Have Your Syllabus Reflect What You Value Most

Design elements to draw attention to the things about your course that you most want to stick with students. This should not come at the expense of being detailed about your classroom policies or meeting institutional requirements for what should be listed on a syllabus.

Tips for the Design Process

  1. Start from a Template: Templates can include great options like two-column newsletter style or a table of contents to make your syllabus easier to reference. MS Word and Google Docs are easy to intermediate skill level tools you can use to create your redesigned syllabus. A few intermediate to advanced skill level tools you can try are Smore, Populr.me, and Tackk.
  2. Get Visual: A visual doesn’t have to be elaborate, but strategically using images, shapes, or flow-charts can be an equally effective way of drawing attention to the most important parts of your syllabus.
  3. Design with Accessibility in Mind: You want to make sure your syllabus is accessible for all students. This should include providing your syllabus in multiple formats and also using easy to read fonts and high contrast colors.
  4. Build Your Design Knowledge: Educate yourself on effective design practices and visual rhetoric.

Beyond the First Day of Class

Use the syllabus at key moments: A great time to ask students to look at the syllabus is when you transition between major units or assignments of the course. You can turn this into a class activity such as having students write a short reflection about how their work in the previous unit helped them develop competencies or achieve course outcomes.

Reinforce concepts from your syllabus in assignments and grading: Use concepts from your syllabus consistently in other course documents including assignment prompts and grading rubrics.

If you do decide to redesign your syllabus keep in mind that accessibility is very important. Don’t assume that a full-color syllabus is accessible to all students. For accessibility, provide multiple options for students to access the content so they can choose what works best for them. This can include printing in color or black and white, sharing the syllabus as a PDF (with character recognition), and using alt-text and captions for images and diagrams.

For more information read the Inside Higher Ed blog post, Give Your Syllabus an Extreme Redesign for the New Year. Another great article on syllbus redesign is Writing Syllabi Worth Reading.

Additional resources you may find helpful:

Interactive syllabus examples:

Image credit: "27Apr09 ~ Planning" by grace_kat is licensed under CC-BY-SA 2.0

checklist

As you prepare for the start of the semester, it is a good time to get started setting up your Blackboard courses. Blackboard courses are automatically created using the course information in Banner a few weeks before the start of the semester. You can post your syllabus, course documents, and announcements to your Blackboard courses. You can also customize your course menu and/or add a course banner.

If you teach a course that is cross listed you will have a Blackboard course for each cross listing. You can combine the cross listed courses into one Blackboard course so that you can post course materials and grades to one combined Blackboard course. Combining courses may also work for you if you are teaching different sections of the same course and would like to have the different sections combined into one Blackboard course so that you can post course documents and grades in the one combined course. The beginning of the semester is the best time to combine your Blackboard courses before you add course material or grades to the courses.

NOTE: Currently, the section merge tool is NOT working. A system administrator will have to merge your courses. Send an email to Yamlak Tsega (ytsega@xula.edu) if you want to merge courses. You should include the course ID (including CRN) for all the courses you want merged together. Also indicate which of the courses to be merged together that you want to be the parent/primary course.

Follow these steps to do it.

Listed below are links with instructions for

Want more information?

Attend a drop-in session to get one-on-one help.
Explore Blackboard’s On Demand Learning Center.
Try these Blackboard How-To documents.
Visit the Blackboard FAQs for additional blackboard information
or schedule a one-on-one session, email, or
call Janice Florent: (504) 520-7418.

by Janice Florent

silhouette of a head with gears within it and looking at a question mark

Research on self-directed learning has shown that people who take the initiative in learning, learn more things and learn better than people who sit at the feet of teachers passively waiting to be taught.

Self-directed learning is especially important for student success in online classes.

Educators have an important role to play in assisting students to acquire the skills for self-directed learning. So how can educators help students develop their ability to direct their own learning, while ensuring that they develop the skills and integrate the knowledge they need to be successful?

In a YardStick blog post, Dr. Tai Munro provided a few suggestions that educators can do to help students to become self-directed learners. Those suggestions are:

  • Give learners control
  • Make the course relevant
  • Focus on actual problems and scenarios
  • Recognize what they already know
  • Help learners reflect

If you are interested in getting more information you should read Dr. Munro’s blog post, But how do I help learners be self-directed?

Image credit: image by Tumisu from Pixabay