The #1 Brightspace complaint we hear from students is that faculty don't post their grades online. When students don’t receive meaningful and timely feedback about their coursework, they are unable to make the necessary adjustments to improve their performance.
This week’s "Grade Book and College Readiness" training session focused on 1) why using the Grade Book to provide students with their standing in the course is important and 2) how to setup and enter grades in the Grade Book.
In case you missed this week’s training session or if you attended the training session and want to recap what was covered, you can review these resources:
Homework that was to be completed before the workshop
Note: Are you doing something innovative in Brightspace or perhaps you've discovered a handy tip? Share how you are using Brightspace in your teaching and learning in The Orange Room.
The #1 Brightspace complaint we hear from students is that faculty don't post their grades online. When students don’t receive meaningful and timely feedback about their coursework, they are unable to make the necessary adjustments to improve their performance.
The Brightspace Grades Tool is useful for providing students with up-to-date information about their current standing in the course. For instructors, it’s useful for assigning and keeping track of student grades. Students can view grade entries and monitor their progress throughout the course.
Note: Are you doing something innovative in Brightspace or perhaps you've discovered a handy tip? Share how you are using Brightspace in your teaching and learning in The Orange Room.
D2L (the company that owns Brightspace) uses Continuous Delivery to update our Brightspace system. The Continuous Delivery model gives us regular monthly updates allowing for incremental and easily integrated changes with no downtime required for our Brightspace system.
Our Continuous Delivery update occurs on the 4th Thursday of each month. D2L provides release notes to help users stay up-to-date with the changes.
Here are a few updates in the September 2019/20.19.9 release that were added to our system this month:
1) Activity Feed - Inline rendering of remote plug-in attachments
When an instructor attaches a remote plug-in via a Quicklink to a message or assignment post, the plug-in now renders inline as an embedded attachment. This allows users to view the material without navigating away from Activity Feed. Previously, a remote plug-in attachment rendered as a simple web link.
An Activity Feed post with a remote plug-in attachment
2) Activity Feed - Message posts now support embed codes
To allow instructors and learners to share more material in a course, users can now paste embed codes directly into the body of message posts in Activity Feed. These embed codes automatically attach and display inline for all users to view and interact with.
An Activity Feed post with an embed code attachment
3) Activity Feed - Improved attachment workflow and thumbnail previews
Users can now attach web links to message and assignment posts by pasting them into the body of messages or the instructions of assignments in Activity Feed. The display of link attachments has also been enhanced to show a thumbnail and description, if available. Previously, links could only be added to posts by the Click and Attach workflow and the display was limited to a simple link icon and title.
An Activity Feed post with the new link styling containing a thumbnail preview and description
To help keep learners up to date on course activity, Brightspace Pulse now displays Activity Feed notifications in the Updates tab, for example, messages and links to course materials and external resources. Tapping an Activity Feed notification displays the post in Brightspace Pulse.
5) Assignments - Grades entered in Assignments and Grade Book are synchronized
When an instructor enters a grade for an assignment submission in the standard or spreadsheet view of Grade Book, the grade also appears with the submission in Assignments. Previously, grades entered in the Assignment tool were passed on to Grade Book; however, grades for assignment submissions entered in Grade Book were not passed to the Assignments tool. This change ensures data consistency between Assignments and Grade Book. Currently Assignment grades are not synchronized when the Assignment tool is updated by the Brightspace API or when Grade Book is exported and imported.
Note: Existing grade data for assignment submissions are not migrated. This synchronization only occurs for new grade entries.
6) Discussions - Grades entered in Discussions and Grade book are synchronized
When an instructor enters a grade for a discussion in the standard or spreadsheet view of Grade Book, the grade also appears with the discussion post in Discussions. Previously, grades entered in the Discussion were passed on to Grade Book; however, grades for discussions entered in Grade Book were not passed to the Discussions tool. This change ensures data consistency between Discussions and Grade Book. Currently Discussion grades are not synchronized when the Discussion tool is updated by the Brightspace API or when Grade Book is exported and imported.
Note: Existing grade data for discussions are not migrated. This synchronization only occurs for new grade entries.
7) Quick Eval – Activities View
In Quick Eval, select Activities to display a list of the assessable activities that have items awaiting evaluation in all your courses. An activity shows up in Quick Eval’s Activities view when there is an unevaluated learner submission, or when all students have not submitted to the activity. This view makes it easy to complete all assessments for one assignment, discussion, or quiz, before moving on to the next task. This feature helps evaluators who prefer to evaluate submissions in the context of an activity. Activities view displays indicators to show the progress on submissions, progress on evaluations, and progress on publishing feedback to learners. It also includes links to the evaluation page, submission page, and a publish all action.
Activities view in Quick Eval
8) Release Conditions - Release condition for topic completion
The Completed content topic is a new release condition that is met when a user completes a content topic. The method of completing the topic depends on the type, such as viewing a file or submitting an assignment. Similar to the currently available Visited content topic release condition, optional topics can also trigger this release condition.
This release condition ignores exemptions, meaning that if the learner completes the activity, the release condition can be met, regardless of the activity being required, optional, or exempt.
The Completed content topic release condition is now available from the Condition Type drop-down list
Note: Are you doing something innovative in Brightspace or perhaps you've discovered a handy tip? Share how you are using Brightspace in your teaching and learning in The Orange Room.
Last week’s tip on Turnitin Feedback Studio provided information and resources on how to setup and use Feedback Studio. Are you curious to find out how you can take advantage of Turnitin Feedback Studio's features? In a recent blog post, John Hetherington (Turnitin Product Writer) provided some tips on how to get the most out of Feedback Studio. Check out his blog post for his 10 Quick Tips for Getting the Best out of Feedback Studio.
Note: Are you doing something innovative in Brightspace or perhaps you've discovered a handy tip? Share how you are using Brightspace in your teaching and learning in The Orange Room.
Course delivery is vulnerable to unplanned events. Potential interruptions to class activities include but are not limited to natural disasters, widespread illness, acts of violence, planned or unexpected construction-related closures, severe weather conditions, and medical emergencies. Whatever the event, an instructional continuity plan will help you to be ready to continue teaching with minimal interruption.
It's not too late to consider developing an instructional continuity plan for your courses. Visit our Instructional Continuity wiki for resources to help you develop your plan.
Do you have a plan? If so, we would like to hear about it. If you had a classroom disruption and found a way for students to continue to make progress in your course, we encourage you to share it with your colleagues. Please email a brief description of what you did along with your reflections on how it worked for you, and we will post it to our Instructional Continuity wiki resource.
As you know, the flipped classroom relies heavily on students being prepared and ready to engage in the learning activities. What do you do when students come to class unprepared? Do you give a quick lecture to recap the pre-class content so everyone is on the same page? Do you give the unprepared students an alternative assignment? Do you kick the unprepared students out of class? Depending on your teaching philosophy and the classroom environment you want to create, you probably want to pro-actively design the learning environment using strategies to promote learning and personal development instead of relying on punitive measures to change behavior.
In a Faculty Focus article, Dr. Barbi Honeycutt recommended five things you can do to motivate unprepared students in the flipped classroom. Her recommendations are:
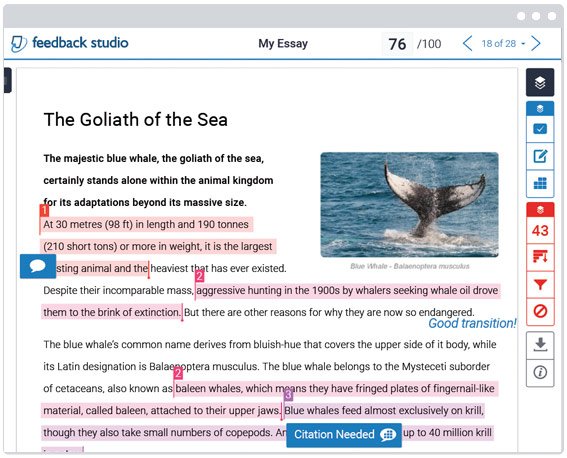
Turnitin Feedback Studio is a program that checks student work for potential plagiarism and allows instructors to provide electronic feedback to students through markup, proofing, and rubrics tools.
Note: Are you doing something innovative in Brightspace or perhaps you've discovered a handy tip? Share how you are using Brightspace in your teaching and learning in The Orange Room.
Do you want to see your student's coursework that needs to be graded all on one page in Brightspace? The Quick Eval tool can help.
Quick Eval is a new tool that allows evaluators to see a list of unevaluated learner submissions from all their courses. Submissions from Assignments, Discussions, and Quizzes are displayed in one location to improve efficiency when locating work that requires evaluation and providing feedback to learners.
Evaluator view of the Quick Eval list
Evaluators can sort, filter, and search submissions to prioritize their evaluation work. Sorting can be done using the first or last name of the learner, Activity Name, Course Name, and Submission date. Filtering can be done using one or more of the following categories: Activity Name, Course Name, and Submission Date. Clicking on a user’s name opens an evaluation screen directly from the Quick Eval list where the evaluator can complete their assessment. The search function in Quick Eval allows evaluators to locate submissions for evaluation by searching for a specific user, assignment, quiz, discussion topic, or course.
When learner submissions are evaluated and published, they no longer show up in the Quick Eval list. An empty Quick Eval list gives educators confidence that no learner submissions are pending evaluation.
Follow these steps to do it.
To access the Quick Eval page:
On the NavBar, click Activities, then click Quick Eval.
All ungraded submissions will be displayed. You can sort submissions by first and last name, activity name, course, or submission date. You can also filter results.
Click the learner's name to evaluate the submission.
To return to Quick Eval page, click Back to Quick Eval.
As you complete and publish evaluations they will no longer appear in Quick Eval.
Note: Are you doing something innovative in Brightspace or perhaps you've discovered a handy tip? Share how you are using Brightspace in your teaching and learning in The Orange Room.
A conversation between Richie Gebauer (Cabrini University) and Jay Todd (XULA) on intentionality and college readiness.
Richie Gebauer is the Executive Director of the First Year Experience and Student Transitions, as well as the Faculty Director of the IMPACT (Leadership) Living and Learning Community, at Cabrini University in Radnor, Pennsylvania. During his tenure, Cabrini's Living and Learning Communities program has expanded to fifteen Learning Communities (comprised of both living and learning communities and non-residential learning communities), which include a special commuter Learning Community, a learning community designed for men of color, and several non-residential learning communities designed to assist academically underprepared students.
Jay Todd studied writing with Frederick and Steven Barthelme and Mary Robison at the Center for Writers at the University of Southern Mississippi. His fiction has appeared in journals such as Southern California Review, Chicago Quarterly Review, Fiction Weekly, and 971 Magazine. Since 2007, he has been a member of Department of English at Xavier, where he teaches American Literature, Freshman Composition, Modern English Grammars, and The Graphic Novel and Social Justice. From 2007 to 2010, Dr. Todd served as Xavier's Writing Center Director. From 2010 until 2015, he served as QEP Director, managing Xavier's Read Today, Lead Tomorrow initiative. In 2015, he became the Center for the Advancement of Teaching and Faculty Development's first Associate Director for Programming. As Associate Director for Programming, Dr. Todd assists in providing high-quality, relevant, evidence-based programming in support of CAT+FD's mission to serve faculty across all career stages and areas of professional responsibility.
Dr. Todd is a member of the Honor Society of Phi Kappa Phi, the Association for Interdisciplinary Studies, the Popular Culture Association, and the Louisiana Association for College Composition.
As I sit in my CAT-FD office I wonder what to focus on for my first blog. An idea finally comes to me – how did I “get here.” Not physically, but what stirred my interest in the Faculty in Residence – Service Learning position. What path did I take?
I start thinking back to how I first became involved in service learning. It was via a FaCTS (Faculty Community of Teaching Scholars) group, the focus of which was sustainability. To be quite honest I don’t know whether my interest in FaCTS stemmed from the stipend offered or an authentic interest in sustainability (or service learning for that matter). In any event I applied, taking what was perceived as a different approach to sustainability. I was teaching Positive Psychology at the time (I am also teaching Positive Psychology this semester) and wondered whether students might be considered a sustainable resource. One could argue that students endure a great deal throughout the semester. There are ups and downs, failures and triumphs, and certainly many challenges. To succeed students must persist, with what could be argued as, dwindling resources. How might students sustain their personal resources and psychological well-being?
In Positive Psychology service learning required students to select an area of themselves that they desired to strengthen, with inspiration coming from the twenty-four character strengths developed by Peterson and Seligman (2004). Students completed the Values in Action (VIA) survey to determine the relative ranking of their 24 strengths and selected a strength to focus on throughout the semester.
How did service learning come into play? Example strengths include optimism, forgiveness, and bravery. Qualities that many senior citizens display. Thus the idea was that senior citizens would serve as role models and mentors for change. The service learning project grew from there, with students visiting senior centers every week – interacting, sharing, and just hanging out with seniors. Reflection was an essential component of the project, with students submitting a weekly service-learning journal consisting of general reflections/observations and requiring students to apply specific course concepts to their experiences and interactions with seniors.
The course and associated service learning project was time consuming, challenging, and required a great deal of monitoring and organization. The results were incredibly rewarding. Meaningful connections were made, in depth discussions occurred, and greater understanding of course concepts facilitated. Thus, while I may not have been initially interested in service learning for service learning sake, through this and subsequent projects I have certainly come to understand the many benefits of service learning, how it enriches student experience, and the importance of creating a service-learning project that is pedagogically sound.
I look forward to serving as the CAT-FD Faculty in Residence – Service Learning. My initial goals include learning more about service learning (at XU, on other campuses, and empirical findings associated with service-learning), ensuring that service learning projects are pedagogically sound, streamlining the process of developing service learning courses and projects, and continued incorporation of service learning in my courses. I anticipate that my goals in this role will evolve, look forward to working with the XU and greater New Orleans community, and am excited to take this journey of discovery.
Reference:
Peterson, C., & Seligman, M. E. P. (2004). Character strengths and virtues: A handbook and classification. Washington, DC, US: American Psychological Association; New York, NY, US: Oxford University Press.


 Richie Gebauer is the Executive Director of the First Year Experience and Student Transitions, as well as the Faculty Director of the IMPACT (Leadership) Living and Learning Community, at Cabrini University in Radnor, Pennsylvania. During his tenure, Cabrini's Living and Learning Communities program has expanded to fifteen Learning Communities (comprised of both living and learning communities and non-residential learning communities), which include a special commuter Learning Community, a learning community designed for men of color, and several non-residential learning communities designed to assist academically underprepared students.
 Jay Todd studied writing with Frederick and Steven Barthelme and Mary Robison at the Center for Writers at the University of Southern Mississippi. His fiction has appeared in journals such as Southern California Review, Chicago Quarterly Review, Fiction Weekly, and 971 Magazine. Since 2007, he has been a member of Department of English at Xavier, where he teaches American Literature, Freshman Composition, Modern English Grammars, and The Graphic Novel and Social Justice. From 2007 to 2010, Dr. Todd served as Xavier's Writing Center Director. From 2010 until 2015, he served as QEP Director, managing Xavier's Read Today, Lead Tomorrow initiative. In 2015, he became the Center for the Advancement of Teaching and Faculty Development's first Associate Director for Programming. As Associate Director for Programming, Dr. Todd assists in providing high-quality, relevant, evidence-based programming in support of CAT+FD's mission to serve faculty across all career stages and areas of professional responsibility.
 As I sit in my CAT-FD office I wonder what to focus on for my first blog. An idea finally comes to me – how did I “get here.” Not physically, but what stirred my interest in the Faculty in Residence – Service Learning position. What path did I take?