Skip to content

You can easily insert images, videos, and other media into your Brightspace course using the "Insert Stuff" option within the Brightspace Editor. Insert Stuff allows you to embed or link to content items and place them within your Brightspace course. Insert Stuff is available anywhere in the course where the Brightspace Editor is available. This includes content item descriptions, announcements, discussions, assignments, quizzes, surveys.

insert stuff window

Depending upon your needs, Insert Stuff allows you to upload and insert media in the following ways:

  • Upload a file from your computer
  • Insert a file from within your Course Offering Files
  • Insert a file from within your Brightspace ePortfolio
  • Create and insert a Video Note (webcam recording)
  • Insert a Youtube video via Youtube Search within Insert Stuff window
  • Insert an image file via Flickr Search within the Insert Stuff window
  • Enter a URL where your media file exists
  • Insert a media file by using the Enter Embed Code option
  • Insert media via a Mediasite Lecture Capture search

The next time you are contemplating using media in your courses, try inserting stuff.

Are you looking for images to use in your courses? Check out my Find Free Images to Use in Your Courses blog post.

Follow these steps to do it.

To insert stuff:

  1. In the Brightspace Editor, place your cursor where you want to insert the media and then click the Insert Stuff button.
  2. Choose the media type you want to insert and follow the prompts.

insert stuff icon shown on Brightspace Editor toolbar

Want more information?

Create a File and Insert Stuff (video)
Brightspace Tip #259: Brightspace Editor
Brightspace Tip #231: Video Notes
Find Free Images to Use in Your Courses

View all the Brightspace training recaps
Instructors Quick Start Tutorial
Brightspace Known Issues
Continuous Delivery release notes
Request a sandbox course
Sign-up for Brightspace training sessions
You can find Brightspace help at D2L's website.
Join the Brightspace Community.
Try these Brightspace How-To documents.
Visit our Brightspace FAQs for additional Brightspace information
or schedule a one-on-one session, email, or
call Janice Florent: (504) 520-7418.

Note: Are you doing something innovative in Brightspace or perhaps you've discovered a handy tip? Share how you are using Brightspace in your teaching and learning in The Orange Room.

D2L rolled out a new modern, upgraded, responsive, accessible, and pretty Brightspace Editor! The new Brightspace Editor became the default editor with our August Continuous Delivery Updates. The Brightspace Editor replaces the old HTML Editor and is the primary method of creating content in Brightspace. The Brightspace Editor allows users to enter text, pictures, or embed audio/video. Advanced users can even embed HTML code.

Brightspace Editor
Brightspace Editor

You can create course content using the Brightspace Editor. For example, the Brightspace Editor is available when you edit discussion topics, create custom instructions for assignment submission folders, create quizzes, create announcements, and create content topics.
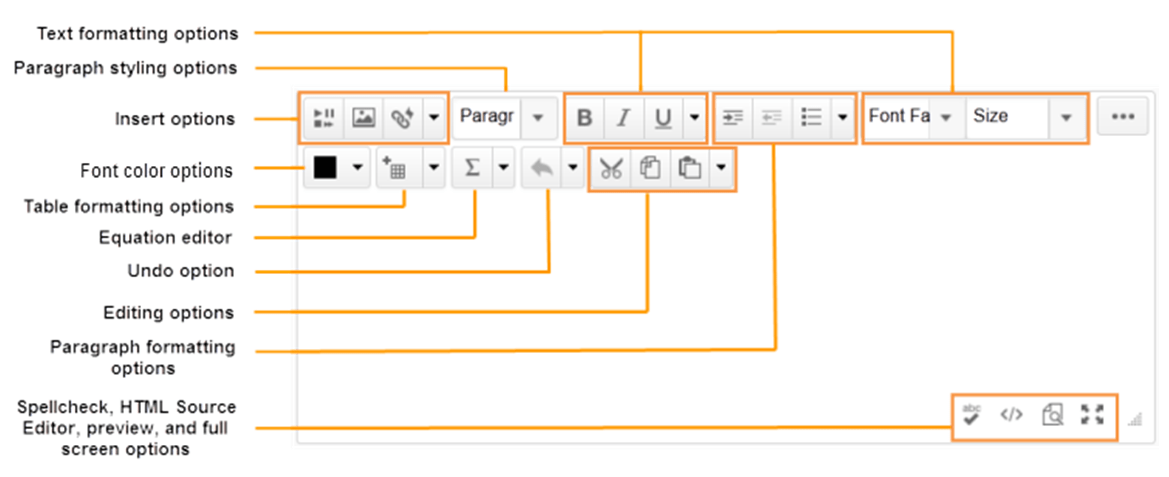
The Brightspace Editor has many icons that match those of common word processing software: bold, left justify, bullets, tables, and so on. It’s important to remember the Brightspace Editor is not a word processor. When you add pictures, links or embed videos, you are creating references to items that are stored internally (in Brightspace) or externally (another web site). If those items are changed or deleted, the reference will not display properly.

Redesigning the editor provided opportunities for D2L to provide a better experience. Some new features were added to the Editor, but there was also a focus on improvements in accessibility, responsiveness, and ease of use:

  • Improved accessibility – D2L ensured that toolbars met the new WCAG 3.0 standards for button spacing and that the keyboard navigation makes sense to users, especially those using screen reader technology. They also recreated their great color picker that highlights WCAG AA compliance to end users.
  • Enhanced responsiveness – The toolbar collapses intelligently based on the size of your screen, with different breakpoints. This means that formatting options collapse together, alignment options, and 'insert' options - creating a great experience on any device.
  • Ease of use – The editor now looks more like a standard web text editor - with all formatting options at the top. Contextual menus are inside the editing experience for quick access while typing. They included the advanced code editor that makes editing html code easier. They upgraded the tables feature and added: format painter, word count, and @mentions in Discussions. All areas clients suggested for improvement in the Product Idea Exchange (PIE).
A breakdown of the new features in the Brightspace Editor
Brightspace Editor: A Breakdown of New Features

Enhancements to the Editor

  • More and different formatting options.
  • An improved color picker with WCAG compliance checking.
  • A full set of emojis and special symbols
  • The move of footer options like 'preview' ' source' 'accessibility checking' and 'expand' to the main toolbar.
  • Updates to the font size menu
  • Removal of Spellchecker*
  • Removal of Cut/Copy buttons (which no longer worked on most browsers anymore in any case)
  • A refreshed Accessibility checker
  • The Brightspace Editor now remembers the open or closed state of the More Actions button, per user, in order to reduce clicks for users that frequently use options in the expanded editor.

*NOTE: The Brightspace Editor does not have a built in spell checker. Your web browser’s built-in spell check functionality is available in the new Brightspace Editor and D2L recommends using it.

Additions to the Editor

  • Format painter that enables you to copy and apply text formatting.
  • New Advanced Tables that includes sorting options.
  • Contextual menus for editing text, links, and images (image editing is not available in all areas)
  • Word Count including character and selection word count
  • Advanced Source Code Editor that includes code suggestions and color coding for tags.
  • Lato font
  • @mentions support in Discussions
  • An 'Other Insert Options' menu for overflow items to improve responsiveness.
  • Limited text pattern support: * * for italics, ** ** for bold, ## for H2, ### for H3, etc until H6.

Want more information?

Using the Brightspace Editor

View all the Brightspace training recaps
Instructors Quick Start Tutorial
Brightspace Known Issues
Continuous Delivery release notes
Request a sandbox course
Sign-up for Brightspace training sessions
You can find Brightspace help at D2L's website.
Join the Brightspace Community.
Try these Brightspace How-To documents.
Visit our Brightspace FAQs for additional Brightspace information
or schedule a one-on-one session, email, or
call Janice Florent: (504) 520-7418.

Note: Are you doing something innovative in Brightspace or perhaps you've discovered a handy tip? Share how you are using Brightspace in your teaching and learning in The Orange Room.

You spent part of your summer getting certified in the XULA-Flex training program. Hopefully you are starting to feel comfortable using Brightspace. If you are wondering what to do next, you should consider taking your course to the next level by adding images.

Images can be used to serve many different purposes. Images are powerful because they:

  • Can help tell a story
  • Can explain a technical process
  • Can convey course information in an alternate format
  • Can break up the monotony of “text-only” pages
  • Can increase student engagement
  • Students pay more attention to articles/readings with graphic content
  • Just make the course look better

Below are examples of a Brightspace course that has a module without images and the same module with images and details. Which one looks better? Which course would you rather interact with?

Example of a course module without images or topic details
Example #1 - Course module without images or topic details
Course module with images and detailed information in the descriptions
Example #2 - Course module with images and detailed information in the descriptions

The images used in example #2 are for decoration, but they do add color and continuity to the course. Also, the descriptions provide students with additional information and links to go to for help. Thus eliminating the need for the student to search around the course for help or to find details about the assignment.

Did you know the HTML Editor has image editing capabilities? You can edit images in place (including flipping, rotating, and adjusting brightness, sharpness, and color), edit the image description, and edit the size of the image.

advanced image editing screen in the HTML Editor
Advanced image editing screen in the HTML Editor

NOTE: Image editing capabilities are exclusive to creating discussion posts, announcements, and content (excluding module descriptions).

You can insert an image anywhere you use the HTML Editor in Brightspace. With a few clicks of your mouse, your Brightspace course can go from boring text only to visually engaging pages of text and images that convey meaning to students in different ways!

Are you looking for images to use in your courses? Here are a few helpful resources:

Follow these steps to do it.

To insert an image in the HTML Editor:

  1. In the HTML Editor, place your cursor where you want to insert the image and then click the Insert Image button.
  2. Follow the prompts.

NOTE: Images that enhance information or contribute to the understanding of text content need alternative text (Alt Text) to be accessible. Images that are purely decorative and add no content value should be identified as decorative.

Want more information?

Understanding the HTML Editor
HTML Editor – Insert Image
HTML Editor – Edit Image Properties
HTML Editor – Adjust Image Description and Sizing
Brightspace Accessibility Tip: Alt Text
Brightspace Accessibility Tip: When "Alt Text" is not Enough

View all the Brightspace training recaps
Brightspace Known Issues
Continuous Delivery release notes
Request a sandbox course
Sign-up for Brightspace training sessions
You can find Brightspace help at D2L's website.
Join the Brightspace Community.
Try these Brightspace How-To documents.
Visit our Brightspace FAQs for additional Brightspace information
or schedule a one-on-one session, email, or
call Janice Florent: (504) 520-7418.

Note: Are you doing something innovative in Brightspace or perhaps you've discovered a handy tip? Share how you are using Brightspace in your teaching and learning in The Orange Room.

You have been using Brightspace for a few semesters now and you are starting to feel comfortable with it. You have mastered the art of uploading files. You create announcements with ease. You have aced using discussion forums. You navigate the Grade Book effortlessly and collecting assignments digitally from your students via assignment submission folders is a breeze.

If you are wondering what to do next, you should consider taking your course to the next level by adding images.

Images can be used to serve many different purposes. Images are powerful because they:

  • Can help tell a story
  • Can explain a technical process
  • Can convey course information in an alternate format
  • Can break up the monotony of “text-only” pages
  • Can increase student engagement
  • Students pay more attention to articles/readings with graphic content
  • Just make the course look better

Below are examples of a Brightspace course that has a module without images and the same module with images and details. Which one looks better? Which course would you rather interact with?

Example of a course module without images or topic details
Example #1 - Course module without images or topic details
Course module with images and detailed information in the descriptions
Example #2 - Course module with images and detailed information in the descriptions

The images used in example #2 are for decoration, but they do add color and continuity to the course. Also, the descriptions provide students with additional information and links to go to for help. Thus eliminating the need for the student to search around the course for help or to find details about the assignment.

You can insert an image anywhere you use the HTML Editor in Brightspace. With a few clicks of your mouse, your Brightspace course can go from boring text only to visually engaging pages of text and images that convey meaning to students in different ways!

Are you looking for images to use in your courses? Here are a few helpful resources:

Follow these steps to do it.

To insert an image in the HTML Editor:

  1. In the HTML Editor, place your cursor where you want to insert the image and then click the Insert Image button.
  2. Follow the prompts.

NOTE: Images that enhance information or contribute to the understanding of text content need alternative text (Alt Text) to be accessible. Images that are purely decorative and add no content value should be identified as decorative.

Want more information?

Understanding the HTML Editor
HTML Editor – Insert Image
HTML Editor – Edit Image Properties
HTML Editor – Adjust Image Description and Sizing
Brightspace Accessibility Tip: Alt Text
Brightspace Accessibility Tip: When "Alt Text" is not Enough

View all the Brightspace training recaps
Brightspace Known Issues
Continuous Delivery release notes
Request a sandbox course
Sign-up for Brightspace training sessions
You can find Brightspace help at D2L's website.
Join the Brightspace Community.
Try these Brightspace How-To documents.
Visit our Brightspace FAQs for additional Brightspace information
or schedule a one-on-one session, email, or
call Janice Florent: (504) 520-7418.

Note: Are you doing something innovative in Brightspace or perhaps you've discovered a handy tip? Share how you are using Brightspace in your teaching and learning in The Orange Room.

You have been using Brightspace for a few semesters now and you are starting to feel comfortable with it. You have mastered the art of uploading files. You create announcements with ease. You have aced using discussion forums. You navigate the Grade Book effortlessly and collecting assignments digitally from your students via assignment submission folders is a breeze.

If you are wondering what to do next, you should consider taking your course to the next level by adding images.

Images can be used to serve many different purposes. Images are powerful because they:

  • Can help tell a story
  • Can explain a technical process
  • Can convey course information in an alternate format
  • Can break up the monotony of “text-only” pages
  • Can increase student engagement
  • Students pay more attention to articles/readings with graphic content
  • Just make the course look better

Below are examples of a Brightspace course that has a module without images and the same module with images and details. Which one looks better? Which course would you rather interact with?

Example of a course module without images or topic details
Example #1 - Course module without images or topic details
Example of a course module with images and detailed information in the descriptions
Example #2 - Course module with images and detailed information in the descriptions

The images used in example #2 are for decoration, but they do add color and continuity to the course. Also, the descriptions provide students with additional information and links to go to for help. Thus eliminating the need for the student to search around the course for help or to find details about the assignment.

You can insert an image anywhere you use the HTML Editor in Brightspace. With a few clicks of your mouse, your Brightspace course can go from boring text only to visually engaging pages of text and images that convey meaning to students in different ways!

Are you looking for images to use in your courses? Here are a few helpful resources:

Follow these steps to do it.

To insert an image in the HTML Editor:

  1. In the HTML Editor, place your cursor where you want to insert the image and then click the Insert Image button.
  2. Follow the prompts.

Want more information?

Understanding the HTML Editor
HTML Editor – Insert Image
HTML Editor – Edit Image Properties
HTML Editor – Adjust Image Description and Sizing

View all the Brightspace training recaps
Brightspace Known Issues
Continuous Delivery release notes
Request a sandbox course
Sign-up for Brightspace training sessions
You can find Brightspace help at D2L's website.
Join the Brightspace Community.
Try these Brightspace How-To documents.
Visit our Brightspace FAQs for additional Brightspace information
or schedule a one-on-one session, email, or
call Janice Florent: (504) 520-7418.

Note: Are you doing something innovative in Brightspace or perhaps you've discovered a handy tip? Share how you are using Brightspace in your teaching and learning in The Orange Room.

You can easily insert images, videos, and other media into your Brightspace course using the "Insert Stuff" option within the HTML Editor. Insert Stuff allows you to embed or link to content items and place them within your Brightspace course. Insert Stuff is available anywhere in the course where the HTML Editor is available. This includes content item descriptions, announcements, discussions, assignments, quizzes, surveys.

insert stuff window

Depending upon your needs, Insert Stuff allows you to upload and insert media in the following ways:

  • Upload a file from your computer
  • Insert a file from within your Course Offering Files
  • Insert a file from within your Brightspace ePortfolio
  • Create and insert a Video Note (webcam recording)
  • Insert a Youtube video via Youtube Search within Insert Stuff window
  • Insert an image file via Flickr Search within the Insert Stuff window
  • Enter a URL where your media file exists
  • Insert a media file by using the Enter Embed Code option
  • Insert media via a Mediasite Lecture Capture search

The next time you are contemplating using media in your courses, try inserting stuff.

Are you looking for images to use in your courses? Check out my Free Image Sites and Tools for Educators blog post.

Follow these steps to do it.

To insert stuff:

  1. In the HTML Editor, place your cursor where you want to insert the media and then click the Insert Stuff button.
  2. Choose the media type you want to insert and follow the prompts.

insert stuff icon shown on HTML Editor toolbar

Want more information?

Create a File and Insert Stuff (video)
Brightspace Tip #43: HTML Editor
Brightspace Tip #102: Video Notes
Free Image Sites and Tools for Educators

View all the Brightspace training recaps
Brightspace Known Issues
Continuous Delivery release notes
Request a sandbox course
Sign-up for Brightspace training sessions
You can find Brightspace help at D2L's website.
Join the Brightspace Community.
Try these Brightspace How-To documents.
Visit our Brightspace FAQs for additional Brightspace information
or schedule a one-on-one session, email, or
call Janice Florent: (504) 520-7418.

Note: Are you doing something innovative in Brightspace or perhaps you've discovered a handy tip? Share how you are using Brightspace in your teaching and learning in The Orange Room.

1

A Quicklink is a way for instructors to insert a direct link to content that is inside or outside of their course.

insert link in HTML Editor

Quicklinks are useful because they allow instructors to provide students with a direct link to content in the course. For example, instructors can create an announcement or email for students with links that take students directly to specific content files or assignments inside of the course.

Instructors should take advantage of Quicklinks, they are useful for pointing students to specific content in the course!

Follow these steps to do it.

Watch this short video for instructions on inserting Quicklinks:

Want more information?

Brightspace Tip #43: HTML Editor
HTML Editor Quick Reference (pdf)
Making Use of the HTML Editor (video)
Format HTML course content
HTML Editor Basics
View all the Brightspace training recaps
Brightspace Known Issues
Continuous Delivery release notes
Request a sandbox course
Sign-up for Brightspace training sessions
You can find Brightspace help at D2L's website.
Join the Brightspace Community.
Try these Brightspace How-To documents.
Visit our Brightspace FAQs for additional Brightspace information
or schedule a one-on-one session, email, or
call Janice Florent: (504) 520-7418.

4

The HTML Editor is the primary method of creating content in Brightspace. It allows users to enter text, pictures, or embed audio/video. Advanced users can even embed HTML code.

You can create course content using the HTML Editor. For example, the HTML Editor is available when you edit discussion topics, create custom instructions for assignment submission folders, create quizzes, create ePortfolio artifacts, and create content topics.

HTML Editor
HTML Editor

Don’t let the name fool you. You don’t have to know anything about HTML (Hypertext Markup Language) in order to use the HTML Editor.

The HTML Editor has many icons that match those of common word processing software: bold, left justify, bullets, tables, and so on. It’s important to remember the HTML Editor is not a word processor. When you add pictures, links or embed videos, you are creating references to items that are stored internally (in Brightspace) or externally (another web site). If those items are changed or deleted, the reference will not display properly.

Want more information?

HTML Editor Quick Reference (pdf)
Making Use of the HTML Editor (video)
Format HTML course content
HTML Editor basics
View all the Brightspace training recaps
Brightspace Known Issues
Request a sandbox course
Sign-up for Brightspace training sessions
You can find Brightspace help at D2L's website.
Join the Brightspace Community.
Try these Brightspace How-To documents.
Visit our Brightspace FAQs for additional Brightspace information
or schedule a one-on-one session, email, or
call Janice Florent: (504) 520-7418.