
Thursday, May 21st, is Global Accessibility Awareness Day (GAAD). GAAD aims to get you talking, thinking, and learning about digital access/inclusion and people with different abilities and talents.
Accessibility is about everyone. It is extremely important for students with disabilities to have access to accessible course content. This includes having access to accessible email.
In a series of accessibility related blog posts, I provide suggestions on how you can make small changes to make your materials accessible. This is the eighth tip in my series of accessibility related blog posts and it focuses on email.
Accessible emails ensure that everyone, including people using assistive technologies like screen readers or visual aids, can read and interact with your messages. Many of the same accessibility principles for content creation also apply to email.
Key Accessibility Best Practices
To make sure your emails are fully inclusive, follow these design and formatting rules:
- Formatting: Break content into short paragraphs and use built-in heading styles (Heading 1, Heading 2) to help users scan your email.
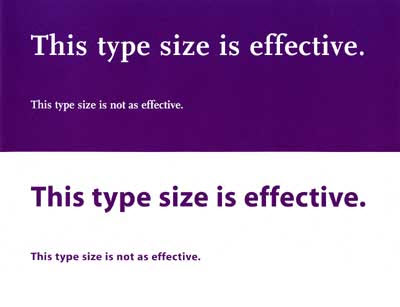
- Font and Size: Use legible, sans-serif fonts (like Arial, Calibri, or Helvetica) at 12pt or larger. Avoid using italics or complex decorative fonts.
- Use Color Mindfully: Ensure there is high contrast between your text color and background. Never rely solely on color to convey information.
- Hyperlinks: Write descriptive link text (e.g., use "Read the Accessible Email Guide" instead of "Click Here").
- Avoid Tables for Layout: Tables should be avoided when you want to simply format other content (i.e., just to line things up neatly.)
- Alt Text for Images: Always add descriptive alternative text for any images so screen readers can describe the visuals. Avoid sending "image-only" attachments, as they are unreadable to assistive software.
Send Email Within Brightspace
Email sent within Brightspace is sent using the Email tool. Within the Brightspace Email tool, you will use the Brightspace Editor to compose the body of your email. The Brightspace Editor has a built-in accessibility checker that makes it easy to check for issues or offer suggestions to fix identified accessibility issues.


You will remove significant barriers for users of assistive technology if you take these suggestions into consideration when creating email. An added bonus is that if you create your emails with accessibility in mind you will be ahead of the game in the event you do have a student who requires the use of assistive technology.
Want More Information
Email the Entire Class or Individual Students in Brightspace
Creating Accessible Emails
Brightspace Tip #582: Accessibility Checker
Email FAQs
Image credit: "celebrate GAAD" by jflorent is dedicated to the public domain under CC0 and is adaption of "disability symbols" by National Park Service in the public domain


