You can easily insert images, videos, and other media into your Brightspace course using the "Insert Stuff" option within the HTML Editor. Insert Stuff allows you to embed or link to content items and place them within your Brightspace course. Insert Stuff is available anywhere in the course where the HTML Editor is available. This includes content item descriptions, announcements, discussions, assignments, quizzes, surveys.
Depending upon your needs, Insert Stuff allows you to upload and insert media in the following ways:
Upload a file from your computer
Insert a file from within your Course Offering Files
Insert a file from within your Brightspace ePortfolio
Note: Are you doing something innovative in Brightspace or perhaps you've discovered a handy tip? Share how you are using Brightspace in your teaching and learning in The Orange Room.
Video Notes is a built-in media recording tool in Brightspace that allows instructors and learners to record short videos (up to 3 minutes) with a webcam. This makes it easy to personalize the learning experience with short, video-based feedback, comments, or instructions. Video Notes can be added where video attachments are supported and when the HTML Editor’s Insert Stuff option is available.
Instructors can use Video Notes to:
Create a new Topic in Content area
Add a Description to a Module or a Topic in the Content area
Create an Announcement
Provide instructions when creating a Submission Folder for Assignments
Provide a feedback on students’ Assignments
Give a description of a new Topic in Discussions or make a post on a Discussion topic
Give students feedback in the Grade Book
Compose an email inside of Brightspace
Anywhere HTML editor is available
Students can use Video Notes in these areas of Brightspace:
When adding comments to uploaded assignments in a Submission folder
When posting a new thread or replying on someone’s thread in Discussion topic
Composing an email inside of Brightspace
Follow these steps to do it.
To create and insert a video note in the HTML Editor:
In the HTML Editor, click the Insert Stuff icon.
Click Video Note.
Select Record Webcam Video, or Upload File.
If Record Webcam Video is selected, follow these steps:
Click New Recording.
Record up to 3 minutes of video and click Stop Recording.
To view the video note, click the play icon.
If you are satisfied with the video, click Next.
Enter a title and description for the video note, and click Next.
Click Insert.
If Upload File is selected, follow these steps:
Click Choose File and select the file you want to upload from your computer.
File format must be MP4, FLV, F4V, or MOV, and file size can be no larger than 5.00 MB.
Note: Are you doing something innovative in Brightspace or perhaps you've discovered a handy tip? Share how you are using Brightspace in your teaching and learning in The Orange Room.
Are there times when you would like your students to sign-up for an activity where there are a limited number of places (e.g., student presentations on a specific class day, study groups, service learning project, office hours, etc.)? The Groups Tool in Brightspace can help you organize sign-ups for one-off events. With the self-enrollment option in the Groups tool, students can add themselves to a group using a sign-up sheet.
The sign-up sheet functions like an electronic version of a paper sign-up sheet. You can make sign-up sheets available to students on the Groups listing page or by inserting a quicklink in the HTML Editor.
Note: Are you doing something innovative in Brightspace or perhaps you've discovered a handy tip? Share how you are using Brightspace in your teaching and learning in The Orange Room.
Image credit: "sign-up" by jflorent is dedicated to the public domain under CC0 and is a derivative of image by DarkWorkX from Pixabay
Additionally, you can ask students to create videos to demonstrate learning. If you are interested how to use videos to demonstrate learning, read my “Video Assignments” blog post.
Video can easily and effectively be incorporated inside your Brightspace courses to provide just-in-time feedback and/or to build in spontaneous interaction.
There are several ways to add videos to your Brightspace courses. Brightspace supports embedding and/or linking to video from many other systems and solutions. Sites such as YouTube, Vimeo, or other video repositories can be embedded easily by clicking the Insert Stuff button in the HTML Editor, choosing the Enter Embed Code option from the list, and then pasting the embed code.
The benefit of embedding video into a course is that it enables the students to stay within the context of the course and within the sequence of instruction, rather than linking out away from course content.
It is a good idea to embed or link to videos rather than uploading video files to your course. You can upload your videos to YouTube, Vimeo, or other media server and then embed or link to the video within the course as explained above. Detailed instructions on recording, uploading, and sharing videos on YouTube can be found in the "Want more information?" section below.
Lastly, you can create Video Notes in Brightspace. Video Notes is a built-in media recording tool that allows instructors and learners to record short videos (up to 3 minutes) with a webcam. This makes it easy to personalize the learning experience with short, video-based feedback, comments, or instructions. Video Notes can be added where video attachments are supported and when the HTML Editor’s Insert Stuff option is available.
Note: Are you doing something innovative in Brightspace or perhaps you've discovered a handy tip? Share how you are using Brightspace in your teaching and learning in The Orange Room.
D2L (the company that owns Brightspace) uses Continuous Delivery to update our Brightspace system. The Continuous Delivery model gives us regular monthly updates allowing for incremental and easily integrated changes with no downtime required for our Brightspace system.
Our Continuous Delivery update occurs on the 4th Thursday of each month. D2L provides release notes to help users stay up-to-date with the changes.
Here are a few updates in the May 2019/20.19.5 release that were added to our system this month:
1) Assignments – Annotate in full screen
When annotating submissions in Assignments, instructors can now toggle to a full screen view. This allows for more screen space to display learner submissions and insert annotations, while removing unnecessary navigation menus.
2) Assignments – Opt-out of Annotations
Instructors can now determine if they want to use the annotation tools when assessing submissions for a specific assignment. Previously, if you had Annotations enabled in a course, all assignments displayed the annotation tools with no option to disable them. The new option allows instructors to easily opt-out of using the annotation tools, without the need to request a configuration change from their administrators.
3) Assignments – Rotate page using annotation tools
Instructors can use the Page Rotation function when assessing assignments using the built-in annotation tools. Depending on the format of a learner submission, documents may appear rotated when initially rendered in the document viewer. Use Page Rotation to quickly reorient the document so it displays as expected.
4) Discussions - Save feedback in draft state
This feature provides instructors the option to save feedback on assessments in draft state prior to publishing it to learners. Now when instructors add feedback to assessments, the Save Draft and Publish buttons display.
Note: The Save Draft button does not appear when a discussion topic is only associated with a rubric.
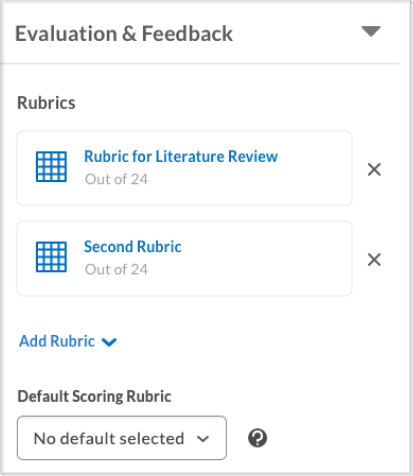
5) Grades - Transfer rubric score to grade item score
This updated feature provides instructors the option to save feedback on assessments in draft state prior to publishing it to learners. Now when instructors add feedback to assessments, the Save Draft and Publish buttons display.
This feature sets the default value of the d2l.Tools.System.Features.GradingExperience configuration variable to Automatic transfer of rubric score to Grade Item. As a result, rubric scores are transferred to the grade item score by default.
The Rubric evaluation page is visible to instructors if a rubric is associated to a grade item, and the grade item is not associated with an activity such as an Assignment, Discussion, etc. When an instructor saves changes made on the Rubric evaluation page, the rubric score is transferred to the learner's grade item score automatically and instructors no longer have to manually transfer the rubric score to a learner's grade item score.
6) Quick Eval – Find and prioritize unevaluated learner submissions in one location
Quick Eval is a new tool that allows evaluators to see a list of unevaluated learner submissions from all their courses. Submissions from Assignments, Quizzes, and Discussions are displayed in one location to improve efficiency when locating work that requires evaluation and providing feedback to learners.
Educators can sort, filter, and search submissions to prioritize their evaluation work. Sorting can be done using the first or last name of the learner, Activity Name, Course Name, and Submission date. Filtering can be done using one or more of the following categories: Activity Name, Course Name, and Submission Date. Clicking on a user’s name opens an evaluation screen directly from the Quick Eval list where the evaluator can complete their assessment. The search function in Quick Eval allows evaluators to locate submissions for evaluation by searching for a specific user, assignment, quiz, discussion topic, or course.
When learner submissions are evaluated and published, they no longer show up in the Quick Eval list. An empty Quick Eval list gives educators confidence that no learner submissions are pending evaluation.
7) Quizzes - Full-screen quiz evaluation
Now instructors can evaluate quiz attempts in full-screen mode. This update enhances an instructor's quiz evaluation experience.
8) Rubrics - Rubrics Grading Experience available for Group Assignments and Discussions
The Rubrics Grading Experience available for assignments and discussions is now available for group Assignments and group Discussions. When a rubric assessment is in draft state, the assessment is not viewable by members of a given group. Once the assessment is published, all group members can view the rubric assessment. Previously, the new Rubrics Grading Experience was only available for regular Assignments and Discussions.
In addition, when a non-file submission assignment is connected to a grade item in the gradebook, the assessment symbol on the Grade All screen launches the assignment assessment experience.
Note: Are you doing something innovative in Brightspace or perhaps you've discovered a handy tip? Share how you are using Brightspace in your teaching and learning in The Orange Room.
Traditional writing assignments are appropriate for many types of assessments, but there is no law that says traditional writing assignments are required for all.
In a Faculty Focus article, Dr. John Orlando explains how student videos can be used to demonstrate learning. He writes,
A good video assignment is to put students into small groups with instructions to make a video that teaches a key concept related to class. If done well, the video not only demonstrates students’ understanding of the concept, but also serves as a resource that can be used by others.
Recent technologies have made video creation remarkably easy and video assignments can be shared in Brightspace. However, you should opt to have the students upload their video files to a video sharing site like YouTube and just provide a link to the video inside Brightspace.
I usually get a lot of questions from faculty related to setting up their Brightspace courses. In the spirit of starting the summer session with less stress, I offer the following course design suggestions to reduce your course setup and management stress:
Setup Grade Book First
Setting up your Grade Book before adding assignments and activities that will be graded simplifies your course creation workflow. Grade items are not automatically created in the Grade Book. Instructors have to setup their grading system and create grade items separately.
When you setup your Grade Book first, you can associate the assignment/activity with the corresponding grade item in the Grade Book at the time you are creating the assignment/activity. This eliminates going back and forth between creating assignments/activities and the Grade Book.
Use Due Dates
Use due dates in Brightspace to help students stay on track. Dates automatically populate into the course calendar. Students will see due dates when they look at entries in the course calendar.
Enter due dates and availability (start/end) dates when you create assignments, assessments, discussion topics and forums, etc. Keep dates aligned with the dates in your syllabus to prevent student confusion about when an assignment/activity is due.
Make Names Consistent
Avoid naming assignment/activities one thing in the syllabus and another in the course (and/or still another in the Grade Book). If your assignment is listed as "Week 5 Short Essay Paper" in the syllabus, but your assignment submission folder is labeled "Educational Technology", you can expect to field questions and/or excuses from students who can’t figure out what they’re supposed to do.
Make things easier for students by making sure an item is named consistently throughout the syllabus and course, and things will be easier for you as well.
Keep Information Consistent
Posting multiple copies of assignment instructions or supplemental material in multiple places in the course is an invitation to trouble because there isn’t necessarily a correlation between them—they can be completely different documents. When there’s a change to the assignment, you have to remember to make edits everywhere you might have posted the information, or risk giving students conflicting information.
Instead of posting multiple copies use Quicklinks, as they are great for making sure information is consistent throughout the course. Quicklinks are useful because they allow instructors to provide students with a direct link to content in the course. For example, instructors can create an announcement or email for students with links that take students directly to specific content files or assignments inside of the course. Because this is a direct link to information in the course, when you make a change to the information it will be updated everywhere in the course because it’s linked.
Copy Course or Copy Components
You do not have to start from scratch when creating content for your course. If you created content in one course you can copy that content or copy components from that course into another course. For example, if you are teaching multiple sections of a course, you can create all the content in one course section and then copy the content into the other sections. Likewise, if you created content in one course (e.g. rubrics, discussions, quizzes, etc.) you can copy that specific content into another course. Copying course content is particularly useful at the start of a semester as it allows you to copy content from a previous semester to a newly created empty course.
Note: Are you doing something innovative in Brightspace or perhaps you've discovered a handy tip? Share how you are using Brightspace in your teaching and learning in The Orange Room.
Today is Global Accessibility Awareness Day (GAAD). GAAD aims to get you talking, thinking and learning about digital access/inclusion and people with different abilities and talents.
Accessibility is about everyone. It is extremely important for students with disabilities to have access to accessible course content.
The Brightspace HTML Editor has a built-in accessibility checker that makes it easy to check for issues or offer suggestions to fix identified accessibility issues.
Follow these steps to do it.
To check for accessibility issues:
After you add content to the HTML Editor, click the accessibility checker icon.
The checker indicates if the content is free of accessibility issues, or offers suggestions to fix them.
Note: Are you doing something innovative in Brightspace or perhaps you've discovered a handy tip? Share how you are using Brightspace in your teaching and learning in The Orange Room.
As you prepare to teach this summer, now is a good time to get started setting up your Brightspace courses. Our Information Technology Center (ITC) has created the summer courses in Brightspace.
To get started, you can post your syllabus, course documents, announcements, and setup your Grade Book in your Brightspace courses. You can also customize your course homepage and/or course image/banner.
If you teach a course that is cross listed you will have a Brightspace course for each cross listing. You can combine the cross listed courses into one Brightspace course so that you can post course materials and grades to one combined Brightspace course. Combining courses may also work for you if you are teaching different sections of the same course and would like to have the different sections combined into one Brightspace course so that you can post course documents and grades in the one combined course. The beginning of the semester is the best time to submit a request to merge your Brightspace courses before you add course materials or grades to the courses.
Additionally, if the summer course you are teaching is the same as one of your previous courses you can copy the entire course (or copy components) into your "empty" Brightspace summer course.
Note: Are you doing something innovative in Brightspace or perhaps you've discovered a handy tip? Share how you are using Brightspace in your teaching and learning in The Orange Room.
As we approach the end of the semester there are a few things you can do in Brightspace to wrap up for the semester.
Release final course grades
Unlike other grade items and categories in the Grade Book, final grades are not available to students by default. Final grades must be released. If you did not choose to enable the automatic release of final grades when setting up your Grade Book, you will have to manually release final grades in order for students to see their final grade.
Export your Grade Book
Student access to courses is removed two weeks after the end of a semester. This process of making the courses inactive allows student work and grades to be visible to instructors but students no longer have access to the course. Courses will remain on the Brightspace system for three semesters before they are removed. You should export (download) your Grade Book to your local computer after you submit your final grades.
NOTE: The export file that is created will NOT contain any student work or instructor feedback. Only the grades in your Grade Book will be exported.
Create a master copy of your course
Courses remain on the Brightspace system for three semesters before they are removed. You can request a Master Course Shell that you can use to develop and maintain your course materials. Master Course Shells will not be removed from the Brightspace system.
Note: Are you doing something innovative in Brightspace or perhaps you've discovered a handy tip? Share how you are using Brightspace in your teaching and learning in The Orange Room.